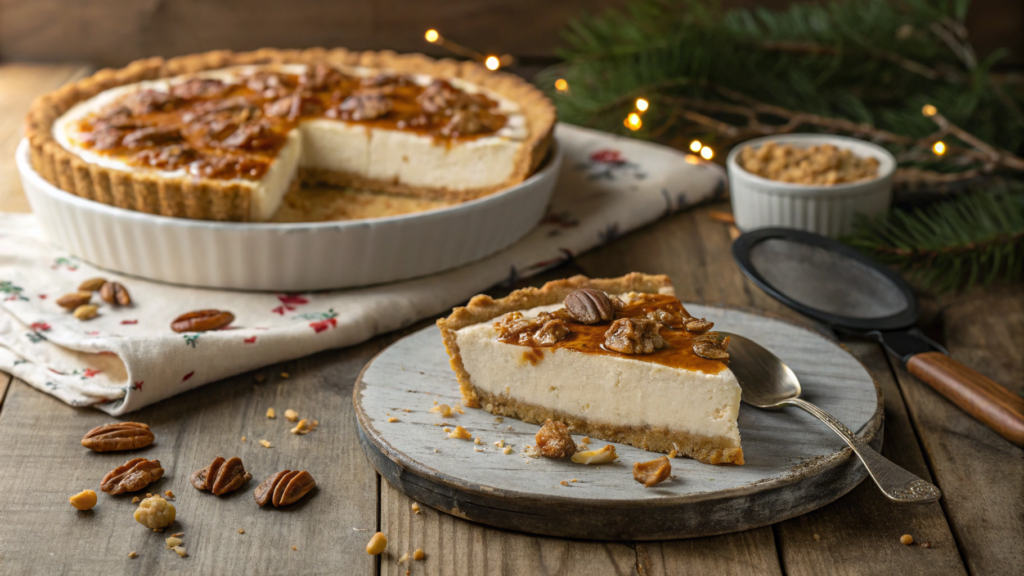
Imagine a dessert that perfectly blends creamy, crunchy, and nutty goodness—sounds like a dream, right? That’s exactly what a pecan cream cheese pie with graham cracker crust delivers. This irresistible pie is a favorite for special occasions or casual family dinners. Did you know pecans are not only delicious but also rich in antioxidants and healthy fats? In this article, I’ll guide you through creating this show-stopping dessert that’s as easy to make as it is delicious. Let’s dive in and make your dessert table the star of the show!
Table of contents
- Why You’ll Love This Pecan Cream Cheese Pie
- Ingredients You’ll Need
- How to Make the Perfect Graham Cracker Crust
- Crafting the Cream Cheese Filling
- Preparing the Pecan Topping
- Assembling and Baking the Pie
- Serving Suggestions and Variations
- Storing and Freezing Tips
- FAQs About Pecan Cream Cheese Pie with Graham Cracker Crust
Why You’ll Love This Pecan Cream Cheese Pie
Oh man, if you haven’t had a pecan cream cheese pie before, you’re seriously missing out. I mean, imagine biting into something that’s the perfect combo of creamy, crunchy, and buttery goodness. That’s this pie in a nutshell (pun intended). It’s one of those desserts that feels fancy enough for a holiday dinner but is surprisingly easy to throw together. Trust me, I’ve made this pie for everything from Thanksgiving to a random Tuesday when I just needed a pick-me-up. And you know what? It’s always a hit.
The Texture is Pure Magic
Let’s start with the textures—because honestly, that’s what makes this pie stand out. The cream cheese filling is smooth and tangy, like cheesecake’s more laid-back cousin. It’s not too sweet, which balances perfectly with the buttery graham cracker crust and those toasted pecans on top. And let’s talk about those pecans for a second. I always toast them before adding them to the pie, and wow, what a difference it makes. Toasting brings out this rich, nutty flavor that pairs beautifully with the creamy filling.
But here’s the real magic: when you slice into the pie, you get this gorgeous layer of textures. The crust holds firm, the filling is silky smooth, and the pecans add just the right amount of crunch. It’s like a party in your mouth, and everyone’s invited.
Easy Ingredients, Big Flavor
One of the best things about this pie? You don’t need any fancy ingredients. Seriously, everything you need is probably already in your kitchen—or just a quick grocery run away. Graham crackers? Check. Cream cheese? Got it. Pecans? You better believe it.
I’ve learned the hard way that sometimes the simplest recipes are the best. I remember once trying a pie recipe that called for a bunch of fancy ingredients—like some kind of imported vanilla bean paste and obscure spices. Spoiler: it was a disaster. That’s what I love about this pecan cream cheese pie. It’s simple, straightforward, and absolutely delicious. No need to stress over tracking down specialty items.
And let me tell you, the prep is a breeze. You can whip up the crust in minutes (seriously, crushing graham crackers is oddly therapeutic), mix the filling in one bowl, and the topping? Just sprinkle those pecans on top and you’re good to go.
Perfect for Any Occasion
This pie is a chameleon—it fits in anywhere. Need a show-stopping dessert for Thanksgiving? Done. Potluck at work? You’re covered. A random weekend treat because life’s been rough? Absolutely.
What I love most is how well it travels. I’ve brought this pie to countless gatherings, and it’s always a crowd-pleaser. It doesn’t matter if people are hardcore dessert lovers or claim they’re “not really into sweets”—this pie wins everyone over.
I’ll never forget bringing it to a potluck once. A friend of mine who’s usually super picky about desserts took one bite and immediately asked for the recipe. She couldn’t believe how creamy and flavorful it was, and she was shocked when I told her how easy it is to make. Honestly, that’s the best compliment you can get as a baker—when someone thinks you’ve spent hours in the kitchen, but really, it was a quick, no-fuss recipe.
So yeah, if you’re looking for a dessert that delivers big on flavor, texture, and ease, this pecan cream cheese pie with a graham cracker crust is your new best friend. Give it a try—you won’t regret it. And don’t be surprised if people start asking you to make it again… and again… and again!
Ingredients You’ll Need
Let’s get one thing straight—your pie is only as good as the ingredients you use. I’ve learned this the hard way after once using stale pecans and off-brand cream cheese. Spoiler: it wasn’t great. So let’s go through exactly what you need for the crust, filling, and topping to make sure your pecan cream cheese pie with graham cracker crust is absolutely perfect. I’ll even toss in a few tips and substitution options to help you out!
For the Crust: Simple, Buttery, and Perfectly Crunchy
The graham cracker crust is such a classic base for creamy pies, and it’s ridiculously easy to make. Here’s what you’ll need:
- Graham crackers (about 10 full sheets or 1 1/2 cups of crumbs)
- Unsalted butter (1/3 cup, melted)
- Granulated sugar (2 tablespoons)
It’s really as simple as crushing the graham crackers, mixing them with melted butter and a bit of sugar, and pressing the mixture into your pie dish. I love using a flat-bottomed measuring cup to press it down evenly—makes life so much easier.
Tip: If you want to add a little extra flavor, sprinkle in a dash of cinnamon or nutmeg. It gives the crust a warm, cozy vibe that pairs beautifully with the pecan topping.
Substitution Option: If you need a gluten-free version, no worries! There are plenty of gluten-free graham crackers on the market that taste just as good.
For the Cream Cheese Filling: Smooth, Tangy, and Just Sweet Enough
The filling is the heart of this pie. It’s rich and creamy, with that perfect balance of sweetness and tanginess that makes you want to keep going back for another slice. Here’s what you need:
- Cream cheese (two 8-ounce blocks, softened)
- Granulated sugar (1/2 cup)
- Vanilla extract (1 teaspoon)
- Eggs (2 large)
Now, let’s talk about cream cheese for a second. Use full-fat cream cheese. I made the mistake of trying to be “healthy” once and used a lower-fat version. Bad idea. The texture wasn’t right, and it didn’t have that luscious, creamy consistency you’re looking for.
Also, make sure your cream cheese is room temperature before you start mixing. If it’s too cold, you’ll end up with a lumpy filling. Nobody wants that.
Substitution Option: If you’re looking for a dairy-free version, you can try using a plant-based cream cheese alternative. Just be sure to pick one with a neutral flavor and similar consistency.
For the Pecan Topping: Sweet, Nutty, and Crunchy
Ah, the topping. It’s what takes this pie from good to unforgettable. Here’s what you need:
- Pecans (1 cup, roughly chopped)
- Brown sugar (1/2 cup)
- Butter (2 tablespoons, melted)
- Heavy cream (2 tablespoons)
- Vanilla extract (1 teaspoon)
Tip: Always toast your pecans before adding them to the pie. It makes such a difference in flavor! Just toss them in a dry pan over medium heat for a few minutes until they’re fragrant. Trust me, it’s worth the extra step.
Quick Substitution Ideas
If you’re out of brown sugar, you can use regular granulated sugar in a pinch, but I’d recommend adding a teaspoon of molasses to mimic that deep, caramel-like flavor.
No heavy cream? Half-and-half works fine, too. Or, if you’re really in a bind, you can use whole milk, but keep in mind the topping won’t be quite as rich.
How to Make the Perfect Graham Cracker Crust
Ah, the humble graham cracker crust. It’s one of those things that seems foolproof—just crush some crackers, mix with butter, and press it into a pie dish, right? Well, yes… and no. A good graham cracker crust can make or break your pie. I’ve had my fair share of crust fails—too crumbly, too soggy, or worse, sticking to the pan like it’s glued on. So, let me save you from those disasters with a step-by-step guide to making a buttery, firm, and totally reliable graham cracker crust.
Step 1: Crush the Graham Crackers
First things first—turn those graham crackers into fine crumbs. You’ve got a couple of options here.
If you have a food processor, toss the crackers in and pulse until they’re finely ground. Easy. But if you’re like me and sometimes can’t be bothered to haul out the food processor (or clean it after), just throw the crackers into a zip-top bag, seal it up, and crush them with a rolling pin. There’s something oddly satisfying about smashing graham crackers. Plus, it’s a great way to get out some frustration!
You’ll need about 1 1/2 cups of crumbs, which is roughly 10 full graham cracker sheets.
Step 2: Mix in the Melted Butter and Sugar
Next, pour 1/3 cup of melted unsalted butter and 2 tablespoons of granulated sugar into your graham cracker crumbs. Stir until the mixture looks like damp sand.
Here’s the trick: you want every crumb to be coated with butter. That’s what helps the crust hold together and gives it that rich, buttery flavor. If your mixture looks dry or isn’t sticking together when you press it, add another tablespoon of melted butter. There’s no shame in a little extra butter.
Step 3: Press the Crust into the Pie Dish
This is where things can go wrong if you’re not careful. The key to a perfect graham cracker crust is pressing it firmly into the dish—firm enough to hold together, but not so hard that it becomes rock solid.
I like to use a flat-bottomed measuring cup to press the crust evenly into the bottom and up the sides of the pie dish. It’s way easier than using your hands, and it gives a smoother finish. Make sure to press the crust into the corners, too—those little gaps can cause problems when you slice the pie later.
Tip: If you notice the crust crumbling while you’re pressing it, that’s a sign you need a bit more butter. Just melt another tablespoon, drizzle it over the crumb mixture, and press again.
Step 4: Bake (or Don’t)
Here’s where you’ve got options.
If your recipe calls for a baked filling, you can bake the crust at 350°F for about 8-10 minutes to set it. This gives it a sturdier texture and deepens the flavor. I love that toasty, buttery smell that fills the kitchen when the crust is baking—it’s a little preview of how delicious your pie will be.
But if you’re making a no-bake pie, you can skip the oven and just chill the crust in the fridge for at least 30 minutes before adding the filling. The chilling time helps the butter firm up and hold the crust together.
How to Prevent a Crumbling Crust
Here’s the thing with graham cracker crusts—they can be a little stubborn.
If your crust keeps crumbling when you cut into the pie, chances are you didn’t press it firmly enough, or it didn’t have enough butter to bind it together.
Another sneaky culprit? Overmixing the crust. I know, it sounds weird, but if you keep stirring the mixture too much, the butter starts to separate from the crumbs, making the crust dry.
And here’s a trick I swear by: after pressing the crust into the dish, freeze it for 10 minutes before baking. This helps solidify the butter, making the crust less likely to fall apart later.
Crafting the Cream Cheese Filling
If there’s one part of a pecan cream cheese pie that makes people go “wow,” it’s the filling. It’s creamy, rich, and just the right balance of sweet and tangy. But let me tell you, getting that silky-smooth texture isn’t always as easy as it looks. I’ve had my share of lumpy disasters—imagine cutting into what should be a dreamy, creamy slice of pie and seeing clumps of unmixed cream cheese. Ugh. So, to save you from those heartbreaks, I’ve gathered my best tips for crafting a filling that’s perfectly smooth every time.
Start with Room Temperature Ingredients
Here’s mistake number one that I used to make all the time: trying to mix cold cream cheese. It’s a disaster waiting to happen. Cold cream cheese doesn’t blend well, and that’s where those dreaded lumps come from.
Instead, take your cream cheese out of the fridge at least 30 minutes before you start baking. You want it to be soft but not melted—like spreadable butter. Same goes for the eggs and any other ingredients you’re using. Trust me, room temperature ingredients are a game-changer.
If you’re in a rush and forgot to take your cream cheese out, here’s a quick trick: cut it into smaller chunks and pop it in the microwave for 10-second intervals until it’s softened. Just don’t overdo it, or you’ll end up with a melted mess.
How to Balance Sweetness and Tanginess
One of the best things about cream cheese filling is that it hits both sweet and tangy notes, making it the perfect pairing for that rich pecan topping. But getting that balance just right can take some trial and error.
Personally, I like to use half a cup of granulated sugar for every two blocks of cream cheese (16 ounces). That gives just the right amount of sweetness without overpowering the tangy cream cheese flavor.
But if you’re someone who loves an even tangier kick, try adding a tablespoon of lemon juice or a dash of sour cream to the mix. It won’t taste lemony—it just brightens the flavor and adds a little extra zing.
On the flip side, if you prefer a sweeter filling, you can bump up the sugar a bit or even add a tablespoon of honey or maple syrup for a more complex sweetness. Just remember: don’t go overboard on the sugar. The pecan topping is sweet enough, so you want the filling to balance that out.
Proper Mixing = No Lumps
Mixing your cream cheese filling sounds simple, but there’s actually a bit of technique to it if you want that silky, lump-free texture.
First, beat the cream cheese on its own for about 2-3 minutes before adding anything else. This helps break it down and smooth out any clumps.
Then, add the sugar and vanilla extract. Keep beating until the mixture is fluffy and smooth. The key here is to scrape down the sides of your bowl often. I’ve made the mistake of rushing through this step, and I ended up with lumps hiding along the edges of the bowl. Not fun.
When it’s time to add the eggs, do it one at a time. I know it’s tempting to just crack them all in at once, but trust me—don’t. Adding them one at a time helps the filling stay smooth and prevents it from getting too runny.
What to Do if You Still Get Lumps
Okay, so let’s say you’ve followed all the tips, and you still see a few lumps. Don’t panic! You can fix it.
One trick I use is to run the filling through a fine-mesh sieve before pouring it into the crust. It takes a little extra time, but it’ll catch any remaining lumps and give you that smooth, professional-looking filling.
Another option? Blend it. If you’ve got a food processor or a blender, give the filling a quick pulse to smooth it out. Just be careful not to overmix it, or you’ll end up incorporating too much air, which can cause the filling to puff up and crack in the oven.
Preparing the Pecan Topping
Ah, the pecan topping—the crown jewel of this pie! It’s what takes this dessert from a simple cream cheese pie to a show-stopping, drool-worthy masterpiece. But here’s the thing: not all pecan toppings are created equal. I’ve made this pie more times than I can count, and through trial and (a lot of) error, I’ve learned a few tricks to get the topping just right—perfectly toasted pecans, a glossy caramel-like finish, and that picture-perfect look that makes everyone ooh and aah when you bring it to the table.
Why Toasting Pecans is Non-Negotiable
If you’re tempted to skip toasting the pecans, let me stop you right there. I used to skip this step, thinking it wouldn’t make much of a difference. Boy, was I wrong. Toasting pecans enhances their flavor and crunch in a way that raw pecans just can’t match. It’s the difference between a pie that’s good and a pie that’s unforgettable.
To toast your pecans, spread them out in a single layer on a baking sheet and pop them in the oven at 350°F for about 8-10 minutes. Keep an eye on them—they can go from perfectly toasted to burnt in a flash. You’ll know they’re ready when your kitchen starts smelling like heaven (aka warm, nutty goodness).
And here’s a tip: don’t chop the pecans before toasting them. Toast them whole, then chop them after. This helps them toast more evenly and prevents the smaller pieces from burning.
Making a Caramel-Like Topping for That Glossy Finish
Now, let’s talk about that caramel-like topping. It’s what holds the pecans together and gives the pie that gorgeous, glossy finish. And the best part? You don’t need to make a complicated caramel sauce from scratch.
Here’s what you’ll need:
- Brown sugar (1/2 cup)
- Butter (2 tablespoons)
- Heavy cream (2 tablespoons)
- Vanilla extract (1 teaspoon)
Melt the butter in a saucepan over medium heat, then stir in the brown sugar and heavy cream. Keep stirring until the mixture comes to a gentle simmer and the sugar is fully dissolved. You’ll know it’s ready when it looks smooth and shiny.
Tip: Don’t let it boil for too long, or it might harden too much when it cools. You want it to stay soft and gooey, not turn into brittle candy.
Once you take it off the heat, stir in the vanilla extract. The vanilla adds a subtle warmth that takes the topping to the next level.
How to Evenly Distribute Pecans for a Picture-Perfect Pie
Okay, you’ve got your toasted pecans and your caramel topping. Now comes the fun part—assembling the topping to make your pie look as stunning as it tastes.
Start by arranging the pecans in a single layer on top of the pie filling. If you’re going for a rustic look, just scatter them evenly. But if you want that wow factor, take a few extra minutes to arrange the pecans in a pattern—spirals, rings, or even rows. It’s a bit time-consuming, but trust me, it’s worth it when people see the finished pie.
Once the pecans are in place, slowly pour the caramel-like mixture over the top. I like to use a spoon to gently spread it around so it coats the pecans evenly. Be careful not to pour it all in one spot—you don’t want to drown the pecans or have uneven coverage.
Tip: If you want to avoid a sticky mess when slicing the pie later, let the topping cool for at least 30 minutes before serving. The caramel will set slightly, making it easier to cut clean slices without pecans sliding all over the place.
Assembling and Baking the Pie
Now that you’ve got your buttery graham cracker crust, creamy filling, and perfectly toasted pecan topping ready to go, it’s time to bring everything together! Assembling and baking a pecan cream cheese pie with graham cracker crust might sound intimidating, but trust me, it’s all about timing and layering things just right. I’ve learned that a few small tweaks during assembly and baking can make a big difference in how your pie looks, slices, and tastes. Let’s dive in and make sure your pie turns out perfect every time.
Layering the Crust, Filling, and Topping for the Best Results
Here’s something I learned the hard way: don’t rush the layering process. If you’re anything like me, you’ll want to just slap everything together and get it in the oven ASAP. But taking your time here really pays off.
Start by making sure your graham cracker crust is completely cooled. If it’s even slightly warm when you add the filling, you risk the crust getting soggy or pulling away from the edges as it bakes.
Once the crust is ready, pour in the cream cheese filling. Make sure to spread it evenly with a spatula, paying close attention to the edges. You want to create a smooth, even layer so that every bite has the perfect balance of crust, filling, and topping.
After the filling is spread, it’s time to add the pecan topping. Here’s a trick: spoon the topping on gently instead of pouring it all at once. This helps you control the distribution and prevents the filling from getting disturbed.
If you’re going for a picture-perfect pie, take a few minutes to arrange the pecans in a pattern. But hey, if you’re in a rush or want a more rustic look, just spread them out evenly. Either way, your pie will be delicious.
Baking Tips to Ensure a Firm Set Without Overcooking
Baking this pie is all about finding that sweet spot—literally. You want the filling to set firm enough to slice, but not so much that it turns rubbery.
Preheat your oven to 325°F. Baking at a slightly lower temperature helps the filling cook gently and evenly.
Bake the pie for 40-45 minutes, but keep a close eye on it toward the end. The center should be slightly jiggly when you gently shake the pan, kind of like a cheesecake. It’ll firm up as it cools, so don’t wait for the center to be completely set, or you risk overbaking it.
Tip: If the pecans on top start to brown too quickly, loosely cover the pie with aluminum foil for the last 10-15 minutes of baking. This protects the topping from burning while allowing the filling to finish setting.
Cooling and Chilling Instructions for Easy Slicing
Here’s where patience really comes into play. I know it’s tempting to slice into the pie as soon as it comes out of the oven (I’ve been there), but cooling and chilling are key for perfect slices.
After removing the pie from the oven, let it cool at room temperature for about 1 hour. This helps the filling set and prevents it from cracking or collapsing when you slice it.
Once it’s cooled, transfer the pie to the fridge and let it chill for at least 4 hours, or even overnight if you can. This chilling time is what gives the pie that firm, creamy texture that holds up beautifully when sliced.
Tip: For super clean slices, run your knife under hot water, wipe it dry, and slice the pie with a warm blade. It makes cutting through the pecan topping much easier and keeps the layers neat and tidy.
Serving Suggestions and Variations
Once your pecan cream cheese pie with graham cracker crust is perfectly baked and chilled, it’s time for the fun part: serving it up and making it your own! Whether you want to keep it classic or get creative with variations, this pie is versatile enough to be dressed up for any occasion. I’ve tried it with different toppings, flavors, and even mini versions, and it never disappoints. Here are some of my favorite serving ideas and tweaks to make this pie uniquely yours.
Pairing Ideas: Whipped Cream, Caramel Drizzle, or a Scoop of Vanilla Ice Cream
Let’s start with the obvious—this pie is delicious on its own, but a little something extra on the side can take it over the top.
If you’re a whipped cream fan, a dollop of fresh, lightly sweetened whipped cream is the perfect companion. I like to add a splash of vanilla extract or even a pinch of cinnamon to the whipped cream to give it a cozy, fall-inspired vibe.
Feeling indulgent? Caramel drizzle is where it’s at. Just warm up some store-bought caramel sauce or make your own if you’re feeling fancy. Drizzle it over each slice right before serving, and watch your guests’ eyes light up. The buttery caramel pairs beautifully with the toasted pecans and tangy filling.
And of course, there’s the classic vanilla ice cream option. I don’t know about you, but there’s something magical about a cold scoop of ice cream melting into a warm slice of pie. If you want to get really adventurous, try pairing it with butter pecan ice cream for an extra nutty twist.
Creative Variations: Adding Chocolate, Bourbon, or Spices
If you’re looking to switch things up a bit, there are plenty of ways to add your own flair to this pie.
Chocolate lovers, this one’s for you! Try adding a layer of melted chocolate to the graham cracker crust before pouring in the cream cheese filling. Just melt some semi-sweet or dark chocolate, spread it evenly over the cooled crust, and let it set before adding the filling. It’s like a secret surprise when you cut into the pie.
Feeling a little bourbon-y? Add 1-2 tablespoons of bourbon to the cream cheese filling or the caramel topping. It adds a rich, smoky depth of flavor that’s perfect for holiday gatherings. Just be warned—it’s the kind of pie people will keep sneaking back to for “just one more slice.”
Want to spice things up? Add a dash of cinnamon, nutmeg, or even a pinch of allspice to the cream cheese filling. It gives the pie a warm, spiced flavor that’s perfect for fall and winter. I’ve even experimented with pumpkin pie spice, and let me tell you, it works surprisingly well!
Tips for Making Mini Pies or a No-Bake Version
If you’re hosting a party or want to make individual servings, mini pies are a great option. You can use a muffin tin to create smaller versions of the pie, which are perfect for serving at gatherings or packing as gifts.
Here’s how to do it:
- Press the graham cracker crust into each cup of a muffin tin.
- Add a spoonful of cream cheese filling to each mini crust.
- Top with pecans and caramel, then bake for about 15-18 minutes at 325°F.
Once they’re cool, they pop right out of the tin, and you’ve got perfectly portioned mini pies that look adorable and taste incredible.
For a no-bake version, skip the oven entirely. Instead, chill the crust in the fridge for at least 30 minutes to firm it up, then add the filling and topping. Let the assembled pie chill for a few hours before serving to give it time to set.
One note about the no-bake version: it’ll be a little softer than the baked version, but it’s still delicious, especially on hot days when you don’t want to turn on the oven.
Storing and Freezing Tips
You’ve made a delicious pecan cream cheese pie with graham cracker crust, and now comes the tricky part—what to do with the leftovers (if there are any!). Storing and freezing pies can be a bit of a balancing act. You want to keep that creamy filling, crunchy pecan topping, and buttery crust as fresh and tasty as when it first came out of the oven. Luckily, with a few simple storage and freezing tips, you can enjoy your pie days or even weeks later without sacrificing flavor or texture.
How to Store Leftovers to Maintain Freshness
If you’ve got leftover pie, you’re in luck—it holds up really well in the fridge for a few days, and it even tastes better after it’s had time to chill. But here’s the key: store it properly to keep it fresh and prevent it from drying out.
First, make sure the pie is completely cooled before storing it. If you put it in the fridge while it’s still warm, condensation will form, and the crust can get soggy (been there, done that).
Once it’s cooled, wrap the entire pie tightly in plastic wrap, making sure to press the wrap against the surface of the pie to minimize air exposure. If you’ve got a pie dish with a lid, even better—pop the lid on for an extra layer of protection.
Leftovers can be stored in the fridge for up to 4-5 days. After that, the crust might start to lose its crunch, and the filling can dry out.
If you’ve already sliced the pie, I recommend storing individual slices in airtight containers. This makes it easier to grab a quick slice when you need a sweet treat, and it keeps the pie fresher for longer.
Freezing Instructions for Long-Term Storage
Want to save your pie for later? Freezing is a great option! The good news is that this pie freezes really well, but there are a couple of tricks to ensure it tastes just as good when you thaw it.
Here’s how to do it:
- Cool the pie completely. (This step is non-negotiable—freezing a warm pie can cause ice crystals to form, which will mess with the texture.)
- Wrap the pie tightly in plastic wrap. I like to do two layers of plastic wrap to make sure it’s well-sealed.
- Wrap it again in aluminum foil. This adds an extra layer of protection against freezer burn.
- Label and date the pie. Trust me, after a couple of weeks in the freezer, you won’t remember what’s inside that foil-wrapped package.
The pie can be frozen for up to 3 months. After that, it’s still safe to eat, but the texture might start to suffer a bit.
If you’re freezing individual slices, wrap each slice in plastic wrap, then place them in a freezer-safe container or bag. This way, you can thaw a single slice whenever you need a dessert fix without having to defrost the entire pie.
Reheating Tips to Retain Flavor and Texture
So, you’ve frozen your pie—now how do you bring it back to life without ruining that beautiful crust or creamy filling?
Here’s my go-to method for thawing and reheating:
- Thaw the pie in the fridge overnight. Don’t try to rush it by leaving it on the counter. Slow thawing in the fridge helps maintain the texture and prevents the filling from getting too soft or watery.
- Once the pie is thawed, you can eat it cold (honestly, it’s really good chilled), or you can reheat it in the oven if you prefer a warm slice.
To reheat:
- Preheat your oven to 325°F.
- Remove any plastic wrap or foil, and place the pie in the oven for about 10-15 minutes.
- If the crust is browning too quickly, cover the edges with foil to prevent burning.
For individual slices, you can reheat them in the microwave for about 15-20 seconds. Just be careful—if you overdo it, the filling can get too soft.
FAQs About Pecan Cream Cheese Pie with Graham Cracker Crust
I’ve had my fair share of questions pop up while making this pecan cream cheese pie, and chances are you might have a few too. From whether it’s okay to cheat with a store-bought crust to how long this pie will last in the fridge, I’ve got you covered with answers to the most common questions about this delicious dessert.
Can I Use a Store-Bought Crust?
Absolutely! If you’re short on time or just don’t feel like making your own graham cracker crust from scratch, a store-bought crust is totally fine. I get it—sometimes convenience wins. Look for a 9-inch premade graham cracker crust in the baking aisle of your grocery store.
That said, if you have a few extra minutes, I’d always recommend making the crust yourself. It’s not hard (crushing graham crackers is kind of fun!), and the homemade version is much more buttery and flavorful. Plus, you can control the thickness of the crust, which is a nice bonus.
But hey, no judgment here if you go with store-bought. The filling and pecan topping will still make it taste incredible.
What’s the Best Way to Prevent a Soggy Crust?
A soggy crust is one of the most common pie frustrations—especially with a graham cracker crust. The good news? There are a few simple tricks to avoid that dreaded sogginess.
First, bake the crust before adding the filling. Even if your recipe says it’s optional, take the time to bake it for 8-10 minutes at 350°F. This helps the crust set and creates a barrier that prevents the filling from soaking in.
Second, make sure the filling is room temperature before adding it to the crust. Pouring warm filling onto the crust can cause it to soften and break down.
Lastly, if you really want to go the extra mile, you can brush the baked crust with a thin layer of melted chocolate or egg white before adding the filling. This creates an extra moisture barrier that keeps the crust crisp and firm.
How Long Can This Pie Be Stored in the Fridge?
Your pecan cream cheese pie will stay fresh in the fridge for up to 4-5 days, but let’s be honest—it probably won’t last that long!
To keep it as fresh as possible, wrap it tightly in plastic wrap or store it in an airtight container. This prevents the filling from drying out and keeps the crust from absorbing any funky fridge smells (because no one wants their pie tasting like last night’s leftovers).
If you want to make the pie ahead of time, I recommend baking it the night before and letting it chill overnight. The flavors actually develop and improve after a few hours in the fridge, so it’s one of those desserts that’s even better the next day.
This pecan cream cheese pie with graham cracker crust is guaranteed to impress everyone at the table. Whether you’re a seasoned baker or a beginner, this recipe is straightforward and delivers stunning results. So why wait? Gather your ingredients, and let’s create a dessert masterpiece that will become a new family favorite!


