Who doesn’t love the smell of a perfectly seasoned pork butt roasting in the oven? Whether you’re cooking for a family gathering or meal prepping for the week, this dish is a showstopper. With its crispy edges and melt-in-your-mouth tenderness, oven roasted pork butt is easier to master than you think. Did you know that the pork butt isn’t from the back of the pig? It’s actually from the shoulder, making it one of the most flavorful cuts for slow roasting. Let’s dive in, and I’ll share everything you need to make this dish unforgettable!
Table of contents
- What is Pork Butt?
- Ingredients for Oven Roasted Pork Butt
- How to Prepare Pork Butt for Roasting
- Step-by-Step Guide to Roasting Pork Butt in the Oven
- Tips for Achieving the Perfect Crust and Tender Interior
- Serving Ideas and Delicious Pairings
- Common Mistakes to Avoid
- Frequently Asked Questions About Oven Roasted Pork Butt
What is Pork Butt?
Ah, pork butt. The name alone can confuse even seasoned cooks—it sure baffled me the first time I came across it! Let me clear things up: pork butt doesn’t come from the back end of the pig, as you might think from the name. Instead, it’s a cut from the upper part of the pig’s shoulder, just above the front leg. The name “butt” comes from old butchery terminology when cuts were stored in barrels called “butts.” So, there you go—a little history lesson to impress your foodie friends.
Boston Butt vs. Pork Shoulder: What’s the Difference?
Okay, so here’s where it gets a little tricky. While both pork butt (sometimes called Boston butt) and pork shoulder come from the same general area—the shoulder—they’re not quite the same. Pork butt is higher up on the shoulder and has more marbling (that’s the fat streaked through the meat), which makes it richer and more tender when cooked. Pork shoulder, on the other hand, comes from the lower part of the shoulder. It’s typically leaner, with more connective tissue and skin, making it great for dishes like pulled pork or stews where slow cooking breaks it all down.
Personally, I learned this the hard way. Once, I bought a pork shoulder thinking it was the same as pork butt for a recipe, and while it was tasty, it didn’t quite have that melt-in-your-mouth quality I was going for. Lesson learned: check the label carefully and know what you’re buying.
Why Pork Butt is Perfect for Roasting in the Oven
Here’s the magic of pork butt: it’s a forgiving cut of meat. The marbling means it stays juicy and flavorful even if you’re not a pro chef. When roasted in the oven, the fat melts and bastes the meat as it cooks, creating an incredible balance of tender, moist interior and a slightly crispy exterior. If you’re a fan of the “bark” on barbecue, roasting pork butt can give you a similar effect with the right seasoning and high heat at the end.
Another reason pork butt is a superstar in the oven? It’s versatile. You can shred it for sandwiches, slice it for a dinner plate, or even repurpose it into tacos or fried rice. And let’s not forget the leftovers—it’s one of those meals that tastes even better the next day. Just pop it back in the oven with a little broth or sauce to keep it moist.
So, if you’re looking for a crowd-pleaser that’s easy to cook and hard to mess up, pork butt is your best bet. Trust me, once you try roasting one to golden-brown perfection, you’ll wonder why it took you so long to jump on the pork butt bandwagon. Just don’t forget to share the story behind its quirky name—it’s a great conversation starter!
Ingredients for Oven Roasted Pork Butt
When it comes to making the perfect oven roasted pork butt, it all starts with the ingredients. Simple as the dish may seem, choosing the right pork and seasonings can make all the difference between “pretty good” and “unbelievably amazing.” Here’s everything you’ll need to get started—and a few tips I’ve learned along the way!
The Essentials: Your Must-Have Ingredients
- Pork Butt: The star of the show! Aim for a cut that’s around 4–6 pounds if you’re cooking for a small group, but you can go larger if you’re feeding a crowd.
- Oil: I prefer olive oil or avocado oil to help the seasoning stick and promote that golden-brown crust.
- Seasonings: Salt and pepper are your base, but you’ll want to layer in more flavors for maximum impact. Think garlic powder, paprika, onion powder, and dried herbs like thyme or rosemary.
- Optional Extras: Crushed garlic cloves, a splash of apple cider vinegar, or even a little honey or brown sugar for a sweet-savory finish. You can also throw in chopped onions and carrots to roast alongside the pork. These soak up the drippings and make for an incredible side dish.
Tips for Selecting the Perfect Pork Butt
Not all pork butts are created equal—trust me, I’ve learned this from experience. When you’re at the butcher or grocery store:
- Look for Marbling: The more streaks of fat running through the meat, the juicier and more flavorful it will be. A well-marbled cut practically bastes itself as it roasts.
- Choose Bone-In if Possible: While boneless is easier to carve, bone-in pork butt tends to retain more moisture and has a richer flavor. Plus, the bone helps conduct heat evenly.
- Opt for Fresh Over Frozen: If you have the option, fresh pork butt typically has better texture and flavor. Frozen works in a pinch, but make sure to thaw it completely before cooking.
Seasoning Blends: Classic vs. Creative
This is where you get to put your spin on things!
- The Classic Approach: Keep it simple with salt, pepper, garlic powder, and paprika. This blend highlights the natural flavors of the pork without overpowering them. It’s my go-to when I’m serving a crowd with mixed tastes.
- Creative Combos: Feeling adventurous? Try adding spices like smoked paprika, chili powder, or cumin for a smoky, barbecue-inspired flavor. For an Asian twist, mix soy sauce, ginger, and a touch of sesame oil into your seasoning. And if you’re in the mood for something sweet and spicy, try brown sugar and cayenne pepper—it’s an incredible combination.
Sometimes, I even make a paste with Dijon mustard, minced garlic, and herbs to rub all over the pork. Not only does it add bold flavor, but it also helps create that beautifully caramelized crust.
How to Prepare Pork Butt for Roasting
Preparing pork butt for roasting is where the magic begins. This isn’t just about tossing it in a pan and hoping for the best—proper preparation sets the stage for tender, flavorful, and juicy results. Here’s a step-by-step guide, along with a few insider tips I’ve picked up (some from trial and error, of course) to get your pork butt ready for the oven.
Step-by-Step: Trimming and Seasoning
- Trim Excess Fat (but Not Too Much):
Start by checking the fat cap—the thick layer of fat on one side of the pork butt. You’ll want to trim it down to about ¼ inch. Too much fat can make the roast greasy, while too little will rob you of that self-basting effect during cooking. A sharp knife is your best friend here. - Pat It Dry:
Moisture is the enemy of a good crust, so pat the pork dry with paper towels. This step helps the seasoning stick better and ensures a crispier exterior. - Season Generously:
Don’t hold back here! Rub the pork butt all over with a little olive oil, then coat it in your seasoning blend. Make sure to massage it into every nook and cranny—yes, get your hands dirty! If you’re using a dry rub, let the salt hit the meat first; it acts as a natural tenderizer.
The Importance of Marinating and Resting
Seasoning is just the start. To let those flavors really penetrate the meat, marinating or resting is a game-changer.
- Marinate for Deeper Flavor:
If time allows, cover the seasoned pork butt in plastic wrap and let it sit in the fridge for 12–24 hours. This step gives the spices time to infuse the meat, creating layers of flavor that go beyond the surface. If you’re short on time, even an hour can make a noticeable difference. - Bring It to Room Temperature:
Before it hits the oven, let the pork butt sit out for 30–60 minutes. Cooking cold meat straight from the fridge can lead to uneven cooking, with the inside lagging behind the outer layers. Trust me, I’ve made that mistake—no one enjoys a perfectly cooked exterior and an underdone center.
Pro Tips for Achieving Optimal Flavor
- Use a Slather:
For extra flavor and a sticky crust, try spreading a slather on the pork before adding your dry rub. A mix of mustard, honey, or even a splash of hot sauce can act as the glue that holds your seasonings in place. - Go for a Crosshatch Score:
If the fat cap is thick, scoring it in a crosshatch pattern allows the fat to render more evenly while helping the seasoning seep into the meat. Plus, it looks fancy when cooked! - Inject Flavor (Optional):
If you really want to step up your game, consider using a meat injector to pump some marinade or broth directly into the pork. This works wonders for keeping it juicy and flavorful throughout.
Step-by-Step Guide to Roasting Pork Butt in the Oven
Roasting pork butt in the oven is one of the simplest ways to transform this humble cut into a masterpiece. With the right temperature, timing, and a little patience, you’ll end up with juicy, fall-apart meat and a beautifully caramelized crust. Here’s a step-by-step guide to ensure your oven roasted pork butt is flawless every time.
1. Preheat the Oven and Set the Right Temperature
Start by preheating your oven to 250°F (120°C) for a low and slow roast. This temperature allows the connective tissues and fat in the pork butt to break down gradually, resulting in that melt-in-your-mouth tenderness we all crave. If you’re in a hurry (but honestly, slow roasting is worth the wait), you can bump it up to 325°F (160°C) for a slightly quicker cook—just know you might sacrifice a bit of juiciness.
Tip: A higher temperature of 450°F (230°C) for the last 15–20 minutes can create an irresistible crust. But more on that later!
2. Choose the Right Roasting Pan or Tray
A heavy-duty roasting pan or a large oven-safe baking dish works best. Place the pork butt fat-side up. Why? Because as the fat melts during cooking, it bastes the meat, keeping it moist and flavorful. You don’t want all that goodness pooling at the bottom instead of soaking into the meat.
For easy cleanup and even cooking, consider using a roasting rack to elevate the pork slightly above the pan. This also helps air circulate around the meat for a more even roast. No roasting rack? No problem—roll up some foil into thick “ropes” and place them under the pork.
3. Roasting Time Based on Weight
The general rule of thumb is to roast pork butt for 40 minutes per pound at 250°F (120°C). Here’s a quick reference:
- 4 lbs: About 2 hours 40 minutes
- 6 lbs: About 4 hours
- 8 lbs: About 5 hours 20 minutes
Keep in mind that these are estimates. Pork butt isn’t something you cook by the clock—it’s done when it’s done! The low and slow method allows the collagen in the meat to break down fully, creating that tender texture you’re after.
4. Monitor the Internal Temperature for Doneness
To know exactly when your pork butt is ready, use a meat thermometer. This tool is non-negotiable for roasting pork to perfection.
- 195°F–205°F (90°C–96°C): The ideal range for shreddable pork. At this temperature, the fat and connective tissue have fully rendered, making the meat tender enough to fall apart with a fork.
- 145°F (63°C): If you prefer to slice your pork rather than shred it, you can remove it from the oven earlier. Just know it won’t have that same melt-in-your-mouth texture.
Insert the thermometer into the thickest part of the pork, avoiding the bone if it’s bone-in. When the meat reaches the desired temperature, remove it from the oven.
Bonus Tips: Finishing Touches
- Resting is Key: After roasting, let the pork butt rest for at least 20–30 minutes before slicing or shredding. This allows the juices to redistribute, so you don’t lose all that moisture when cutting into it.
- Crisp It Up: If you love a crispy crust, crank up the oven to 450°F (230°C) for the last 15–20 minutes. Just keep an eye on it so it doesn’t burn.
Tips for Achieving the Perfect Crust and Tender Interior
Mastering the art of oven-roasted pork butt is all about balance—getting that golden-brown crust while ensuring the inside stays juicy and tender. It’s easier than you think, especially when you’ve got a few tried-and-true techniques up your sleeve. Here are some tips to help you nail it every time.
Tricks for a Golden-Brown Crust
- Start with a Dry Surface:
Before seasoning, pat the pork butt completely dry with paper towels. Any moisture on the surface will steam the meat instead of allowing it to brown. - Season Generously:
A good crust starts with the seasoning. Salt is key here—it not only enhances flavor but also draws moisture to the surface, which helps create a caramelized, crispy layer. Adding sugar (like brown sugar or honey) to your rub can also promote browning, but keep an eye on it during cooking to avoid burning. - Use High Heat for a Finishing Touch:
Roast your pork butt low and slow for tenderness, but crank up the heat to 450°F (230°C) during the last 15–20 minutes to achieve a gorgeous crust. This technique is like magic—it transforms a simple roast into a showstopper. - Baste for Extra Flavor:
Basting with pan drippings or a glaze can add an extra layer of caramelization. Brush on a mixture of melted butter, apple cider vinegar, or even your favorite barbecue sauce during the final minutes of roasting. Just don’t overdo it; you want the surface to crisp, not become soggy.
How to Keep the Meat Juicy While Cooking
- Low and Slow is the Way to Go:
Roasting at a lower temperature, like 250°F (120°C), gives the fat and connective tissues time to break down, keeping the meat juicy and tender. It also minimizes the risk of drying out the pork. - Fat-Side Up:
Always place the pork butt fat-side up in the roasting pan. As the fat renders, it will drip down and naturally baste the meat, locking in moisture and adding flavor. - Tent with Foil:
If the crust starts to darken too much before the meat is fully cooked, loosely tent the pork butt with foil. This shields it from direct heat while still allowing the internal temperature to rise gradually. - Add Moisture to the Pan:
Pour a little chicken stock, apple juice, or water into the roasting pan before cooking. This creates a steamy environment that keeps the meat from drying out. Plus, those juices mix with the drippings to make an amazing base for a sauce or gravy.
Resting the Pork Butt Before Slicing
Resting the pork butt after roasting is not optional—it’s essential. Here’s why:
- Retains Juices:
When you pull the pork butt from the oven, the juices inside are still moving around due to the heat. Letting the meat rest for 20–30 minutes allows these juices to redistribute throughout the roast, ensuring every bite is juicy. - Makes Slicing Easier:
Resting also firms up the meat slightly, making it easier to slice or shred without it falling apart prematurely. - Wrap It Up:
To keep the pork warm while resting, tent it loosely with foil. Avoid wrapping it too tightly, as that can trap steam and make the crust soft.
Bonus Tip: Pairing Crust and Tenderness
To get the best of both worlds, aim for contrast: a beautifully crisp crust on the outside and tender, melt-in-your-mouth meat on the inside. By combining these techniques—starting with low heat, finishing with a blast of high heat, and resting properly—you’ll have a pork butt that’s the envy of every dinner table.
The best part? This isn’t one of those fussy dishes. Once you know the basics, it’s almost foolproof, and you can tweak the process to fit your taste. Now go forth and roast like a pro!
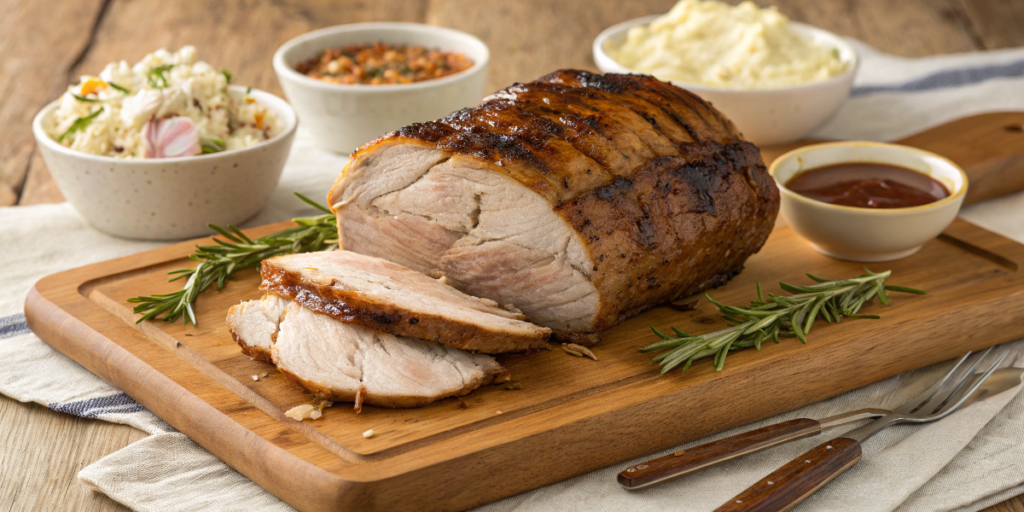
Serving Ideas and Delicious Pairings
You’ve roasted the perfect pork butt, and now it’s time to enjoy the fruits of your labor. Whether you’re slicing it for a fancy dinner or shredding it for a casual spread, roasted pork butt is incredibly versatile. Let’s dive into some serving ideas, perfect side dishes, and creative ways to turn leftovers into something just as exciting as the main meal.
Slicing vs. Shredding: How to Serve Your Pork
- Slicing for Elegance:
If you’ve cooked the pork to a lower internal temperature (around 145°F–165°F), it will be firmer and easier to slice. Use a sharp knife to cut thin, even slices, showcasing that beautiful crust and juicy interior. Sliced pork is perfect for plating alongside classic sides like mashed potatoes and gravy. - Shredding for Comfort:
For pork cooked to the fall-apart tender stage (195°F–205°F), shredding is the way to go. Use two forks to pull the meat apart into juicy strands, or, if you’re like me and a little impatient, use clean hands—it’s messy but oddly satisfying! Shredded pork is amazing for sandwiches, tacos, or even as a topping for loaded baked potatoes.
Perfect Side Dish Pairings
A roasted pork butt is rich and flavorful, so pairing it with the right sides can really round out the meal. Here are a few tried-and-true options:
- Roasted Vegetables:
Toss carrots, Brussels sprouts, sweet potatoes, or parsnips with olive oil, salt, and pepper, and roast them alongside the pork. The vegetables soak up some of the pork drippings for extra flavor—so good! - Mashed Potatoes:
Creamy mashed potatoes are a classic pairing. Add garlic, butter, and a splash of cream for a decadent side that complements the savory pork perfectly. - Coleslaw:
A tangy, crunchy coleslaw cuts through the richness of the pork. Whether you prefer a creamy mayo-based slaw or a zesty vinegar one, it’s a refreshing contrast to the main dish. - Cornbread or Rolls:
Warm, buttery cornbread or soft dinner rolls are perfect for sopping up any drippings or sauce. They’re also great for making mini sandwiches if you’re serving a crowd buffet-style.
Creative Ways to Use Leftovers
If you’re lucky enough to have leftovers, roasted pork butt can be transformed into all kinds of delicious new dishes.
- Tacos:
Reheat the shredded pork and pile it into warm tortillas. Top with diced onions, cilantro, a squeeze of lime, and maybe some salsa verde. Quick, easy, and crowd-pleasing! - Pulled Pork Sandwiches:
Add a dollop of barbecue sauce to the shredded pork and pile it high on a toasted bun. Pair it with a side of coleslaw for a perfect sandwich. - Fried Rice:
Dice the pork into small pieces and toss it into fried rice with veggies, scrambled eggs, soy sauce, and a touch of sesame oil. It’s a quick and flavorful meal that comes together in minutes. - Soup or Stew:
Add chunks of leftover pork to a hearty vegetable soup or chili. The smoky flavor of the pork adds depth and richness to the broth. - Breakfast Hash:
Combine diced pork with roasted potatoes, onions, and peppers. Fry it all up in a skillet and top with a fried egg for a hearty breakfast or brunch.
Common Mistakes to Avoid
Roasting pork butt might seem foolproof, but a few common mistakes can make the difference between “wow, that’s amazing!” and “eh, it’s okay.” Don’t worry—I’ve been there, and I’ve learned from my missteps so you don’t have to. Here’s what to watch out for when preparing your oven roasted pork butt.
1. Overcooking or Undercooking the Pork Butt
Let’s be honest—this is probably the easiest mistake to make. Pork butt is all about timing and temperature, and getting it wrong can lead to dry, tough meat or, worse, a roast that’s still raw in the center.
- Undercooking:
The meat might look done on the outside, but if the internal temperature hasn’t reached 195°F–205°F, it won’t have that fall-apart tenderness you’re aiming for. Always use a meat thermometer to check the internal temp—guesswork is not your friend here. - Overcooking:
Yes, pork butt is forgiving, but if you roast it too long or at too high a temperature, it can dry out. Stick to the low-and-slow method (250°F–300°F), and you’ll avoid this pitfall.
Pro Tip: Don’t trust the “pop-up” thermometers some roasts come with—they’re notoriously unreliable. Invest in a good digital meat thermometer instead.
2. Skipping the Resting Period
This is the classic rookie mistake (and one I’ll admit I’ve made more than once). When that pork butt comes out of the oven, it’s tempting to dive right in. But slicing or shredding it immediately can cause all those precious juices to run out, leaving you with dry meat.
- Why Resting Matters:
Resting allows the juices to redistribute throughout the meat. Think of it like letting a pie cool—sure, you could cut into it right away, but you’ll end up with a mess. - How Long to Rest:
Let the pork butt rest for at least 20–30 minutes. Cover it loosely with foil (not too tight—you don’t want to trap steam and ruin the crust).
Pro Tip: If you’re short on time, you can rest the pork in a cooler lined with towels to keep it warm. It’s a great hack for when you’re juggling multiple dishes.
3. Using the Wrong Type of Pan or Foil
Believe it or not, your choice of pan and whether or not you use foil can make or break your roast.
- Too Small of a Pan:
A pan that’s too snug won’t allow proper air circulation around the pork, which can prevent even cooking. Plus, if the drippings don’t have enough room, they can burn and fill your kitchen with an unpleasant smoky smell (been there, done that). Use a large roasting pan or baking dish with enough room for the meat to breathe. - Skipping the Rack:
If you don’t elevate the pork on a roasting rack (or a DIY rack made from foil rolls), the bottom of the meat can stew in its juices instead of roasting. This leads to a soggy crust—not ideal when you’re after a nice, crispy exterior. - Improper Use of Foil:
Covering the pork too tightly with foil during roasting can trap steam and ruin the crust. If you need to shield the pork from over-browning, tent the foil loosely instead.
Pro Tip: If you don’t have a roasting rack, you can place the pork on a bed of thickly sliced onions, carrots, or potatoes. They’ll elevate the meat and absorb some of the drippings for a built-in side dish.
Frequently Asked Questions About Oven Roasted Pork Butt
When it comes to cooking pork butt, even the most seasoned home cooks have a few burning questions. From figuring out cooking times to reheating leftovers without losing that juicy tenderness, I’ve got answers to the most common questions about this crowd-pleasing dish.
How Long Should I Cook Pork Butt Per Pound?
The general rule of thumb is 40 minutes per pound when roasting at a low temperature, around 250°F (120°C). But, and this is important, pork butt is done when it’s done. Timing gives you a ballpark estimate, but a meat thermometer is your best friend for getting it right.
Here’s a quick guide to roasting times based on weight:
- 4 pounds: About 2 hours 40 minutes
- 6 pounds: About 4 hours
- 8 pounds: About 5 hours 20 minutes
That said, aim for an internal temperature of 195°F–205°F for pull-apart tender meat. If you prefer slicing it, you can stop at 145°F–165°F, but it won’t have that same buttery texture.
Can I Cook Pork Butt Ahead of Time?
Absolutely! Pork butt is one of those dishes that tastes even better the next day because the flavors have had time to meld. Cooking it ahead can also save you stress if you’re hosting or juggling multiple dishes.
- Make It a Day Ahead:
Roast the pork butt as usual, let it rest, and then shred or slice it. Store it in an airtight container with some of the pan drippings to keep it moist. - Reheating Tips:
To reheat, place the pork in a covered baking dish with a splash of broth, apple juice, or barbecue sauce to prevent it from drying out. Warm it in the oven at 300°F (150°C) until heated through, about 20–30 minutes.
Pro Tip: If you’re reheating shredded pork, you can also do this in a skillet over medium heat. Add a little liquid and stir frequently for evenly warmed meat.
What’s the Best Way to Reheat Leftovers?
Leftover pork butt is a gift that keeps on giving, but reheating it without losing its juiciness requires a little finesse.
- In the Oven:
Place the pork in a covered dish or wrap it loosely in foil with a bit of liquid (broth, drippings, or barbecue sauce). Heat at 300°F (150°C) until it’s warmed through. This method is best for larger portions. - On the Stove:
For shredded pork, use a nonstick skillet or cast iron pan over medium heat. Add a splash of liquid and stir gently until the meat is hot. - In the Microwave (if you must):
If you’re in a hurry, you can microwave small portions. Add a little liquid to the pork, cover it with a microwave-safe lid or damp paper towel, and heat in 30-second intervals, stirring between each.
Pro Tip: Avoid reheating leftovers more than once. Only warm up what you plan to eat to maintain quality and flavor.
Oven roasted pork butt isn’t just a meal; it’s an experience. From the rich aroma filling your kitchen to the first fork-tender bite, it’s a dish that delivers comfort and joy. With the tips and techniques shared in this guide, you’re ready to impress family and friends with a perfectly roasted pork butt. So, gather your ingredients, preheat that oven, and let’s get cooking! If you try this recipe, let me know how it turned out—I’d love to hear about your culinary success!


