Craving a snack that’s both healthy and convenient? Look no further than no-bake fruit and nut bars! These little powerhouses are perfect for a quick energy boost or a guilt-free treat. But have you ever wondered about the calorie count in one serving? Let’s break it down! From calorie-conscious insights to customization tips, this guide has everything you need to know about these nutrient-packed snacks. Ready to dig in?
Table of contents
- What Are No-Bake Fruit and Nut Bars?
- Calorie Count for 1 Serving: What to Expect
- Nutritional Benefits of No-Bake Fruit and Nut Bars
- How to Make No-Bake Fruit and Nut Bars at Home
- Tips for Customizing Your Fruit and Nut Bars
- Storing and Serving Your No-Bake Bars
- Comparing Store-Bought vs. Homemade Options
- Frequently Asked Questions About No-Bake Fruit and Nut Bars
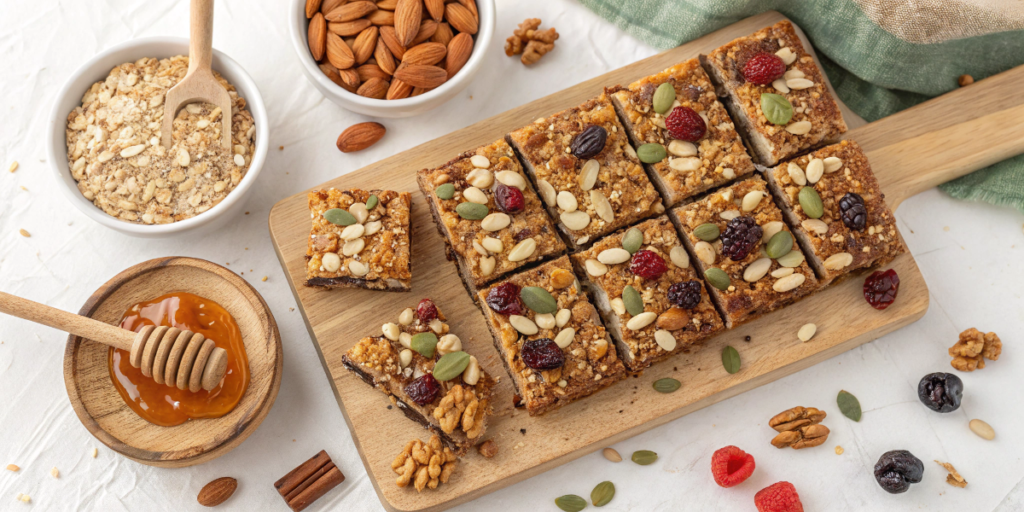
What Are No-Bake Fruit and Nut Bars?
If you’ve never tried no-bake fruit and nut bars, let me tell you: they’re basically little bites of heaven that are as practical as they are delicious. Think of them as the perfect fusion of healthy ingredients and convenience. No baking means no waiting for an oven to preheat or worrying about burning anything—seriously, how many times have I done that with cookies? These bars are all about mixing, pressing, and letting the fridge do the work.
The Magic of Simple Ingredients
The beauty of no-bake fruit and nut bars lies in their simplicity. Most recipes start with a base of dried fruits—like dates, apricots, or raisins—because they’re naturally sweet and sticky, which helps hold everything together. Nuts like almonds, walnuts, or cashews bring that satisfying crunch, while seeds like chia or sunflower seeds sneak in some extra nutrition. You’ll also need a sweetener, like honey or maple syrup, to boost the flavor and act as a glue (and yes, I’ve totally tried skipping this step before—spoiler alert: crumbly disaster).
Then there’s the binding agent, often nut butter or coconut oil. Without it, you’ll end up with granola instead of bars, which isn’t necessarily a bad thing, but not what we’re going for here. My favorite combo? Almond butter and a touch of coconut oil—it’s like a tropical vacation in snack form.
Why Everyone Loves Them
No-bake bars have become so popular because they’re ridiculously easy to customize. They’re kind of like a blank canvas for whatever flavors you’re into. Want something chocolatey? Toss in some cocoa powder or mini chocolate chips. Need more protein? Add a scoop of your favorite protein powder. The possibilities are endless, and that’s what makes them such a hit.
Another reason they’re perfect? They’re a busy person’s dream snack. Whether you’re running out the door for work, packing lunches, or prepping for a road trip, these bars are portable, non-messy, and packed with energy. I once made a batch before a weekend hike, and let me tell you, they were a lifesaver when we were halfway up the trail and starving. Bonus: they’re way cheaper and healthier than store-bought energy bars, and you know exactly what’s in them.
A Snack You’ll Actually Feel Good About
The best part? No-bake fruit and nut bars are as healthy as they are satisfying. You’re getting natural sugars from dried fruits, heart-healthy fats from the nuts, and a little fiber from seeds or oats. Plus, there are no preservatives or weird ingredients you can’t pronounce. And trust me, when you make them at home, you feel a little smug every time you pull one out of the fridge.
So, whether you’re a pro at making snacks from scratch or just someone who wants to eat a little healthier, no-bake fruit and nut bars are a win-win. And if you mess up the first time, hey, at least you’ll still have a tasty pile of trail mix to snack on!
Calorie Count for 1 Serving: What to Expect
When it comes to no-bake fruit and nut bars, knowing the calorie count is a game-changer—especially if you’re trying to eat healthy or stick to a specific diet plan. The thing is, these bars might be small, but they’re mighty. Packed with natural sugars, healthy fats, and fiber, they’re the kind of snack that keeps you full and satisfied. But, like most good things, moderation is key.
The Average Calorie Range
On average, a single serving of a no-bake fruit and nut bar falls somewhere between 150 to 250 calories. This range can vary based on what you throw into the mix. For instance, a bar heavy on nuts and nut butter will be closer to the higher end because of the healthy fats. Meanwhile, a bar loaded with oats and dried fruits might hover closer to 150 calories. And let’s not forget the extras—add chocolate chips or drizzle some honey on top, and the numbers start to climb.
I remember the first time I made these bars and didn’t even think about portion size. I cut massive squares and thought, “Oh, this is healthy, so it’s fine!” Well, after a few bites, I realized I’d probably eaten two servings in one go. Oops.
Portion Size: The Silent Culprit
Here’s the deal: portion size is everything when it comes to calorie control. A “serving size” for these bars is usually about 1.5 to 2 ounces—or roughly the size of a credit card. Anything bigger, and you’re likely doubling the calories without even realizing it.
The great thing about making these at home is that you get to control how big or small you want the portions to be. If you’re someone who loves snacking (hi, that’s me), try cutting the bars into smaller squares or rectangles. That way, you can enjoy two pieces without overloading on calories.
Example Calorie Breakdown
To give you a better idea, here’s a quick breakdown of the calorie content for a typical no-bake fruit and nut bar recipe:
- Base ingredients:
- Dates (1 cup): ~415 calories
- Almonds (1 cup): ~530 calories
- Chia seeds (2 tablespoons): ~120 calories
- Peanut butter (1/4 cup): ~380 calories
- Oats (1/2 cup): ~150 calories
- Extras:
- Honey (2 tablespoons): ~120 calories
- Mini chocolate chips (2 tablespoons): ~140 calories
If you slice this into 10 bars, each serving would be about 186 calories. Of course, if you cut them smaller or skip extras like chocolate chips, you can lower the calorie count significantly. But, let’s be honest, who skips the chocolate?
Finding Your Sweet Spot
Here’s my tip: take the time to weigh out your portions before slicing the bars. It might sound tedious, but it’s super helpful if you’re trying to stay on track. Use a kitchen scale or even just eyeball it by dividing the batch evenly. Also, consider swapping higher-calorie ingredients with lighter ones—like using powdered peanut butter instead of the regular kind or substituting honey with zero-calorie sweeteners.
In the end, knowing the calorie count doesn’t mean you have to obsess over every bite. It’s about balance. These bars are nutrient-dense, so even if they’re a bit higher in calories, they’re a way better choice than, say, a bag of chips or a processed granola bar. Plus, they’re made with love (and a little bit of effort), which makes them even more satisfying!
Nutritional Benefits of No-Bake Fruit and Nut Bars
No-bake fruit and nut bars are basically nature’s energy bars—simple, wholesome, and packed with nutrients that actually do your body some good. Whether you’re fueling up for a workout or trying to survive the afternoon slump at work, these bars are a fantastic choice. Let’s dig into why they’re a nutritional powerhouse!
Loaded with Healthy Fats, Fiber, and Natural Sugars
The magic of these bars starts with their ingredients. Nuts like almonds, walnuts, and cashews bring a hefty dose of healthy fats that are great for your heart and brain. Plus, they make the bars taste indulgent and satisfying, which is a win in my book. Healthy fats are what give you that slow, steady energy release instead of the dreaded sugar crash.
Then there’s fiber, which comes from ingredients like oats, seeds, and dried fruits. Fiber is your digestive system’s best friend—it keeps things moving, helps you stay full longer, and even regulates blood sugar levels. I used to think all snacks had to be carb-heavy to fill me up, but after discovering fiber-packed bars, I felt fuller without feeling bloated.
And let’s not forget the natural sugars in dried fruits like dates or raisins. Unlike refined sugar, these bring along vitamins and minerals like potassium and magnesium. They give you that quick energy boost but without the jittery feeling you get from candy or sugary drinks. Plus, they act as a natural binder for the bars, so no need for processed stuff.
Dried Fruits and Nuts: A Match Made for Energy
Dried fruits and nuts are the real MVPs when it comes to sustained energy. Dried fruits are like concentrated little packets of natural sugar, paired with antioxidants and micronutrients. Dates, for example, are rich in potassium, which helps keep your muscles happy (no more post-workout cramps!). Apricots bring vitamin A for your skin and eyes, while cranberries add a tangy twist along with immune-boosting vitamin C.
Nuts, on the other hand, are packed with protein and healthy fats, which are crucial for energy that lasts. A handful of almonds or walnuts can keep you going for hours because they slow down how your body absorbs sugar. That’s why these bars are perfect for moments when you need steady energy—like during a long meeting, a hiking trip, or, honestly, chasing after your kids.
Perfect as a Pre-Workout or Midday Snack
Ever tried hitting the gym on an empty stomach? It’s not fun. That’s where no-bake fruit and nut bars come in. Thanks to the mix of carbs from the dried fruits and protein from the nuts, they provide the perfect balance of quick and slow-release energy. Grab one about 30 minutes before a workout, and you’ll notice the difference—it’s like having a secret weapon in your gym bag.
They’re also a lifesaver for those mid-afternoon energy dips. You know, that time of day when you’re tempted to reach for coffee or a candy bar? Instead, these bars can keep you focused and satisfied without the crash later. Plus, they’re portable, so you can toss one in your bag and snack on the go.
How to Make No-Bake Fruit and Nut Bars at Home
Making no-bake fruit and nut bars at home is easier than you think—seriously, if you can stir ingredients together, you’re already halfway there. What I love most about these bars is how customizable they are. You can tweak the recipe to match your taste, dietary needs, or whatever you have in your pantry. Plus, they’re way cheaper than the store-bought ones, and you know exactly what’s going into them. Let’s break it down step by step.
Step-by-Step Recipe Overview
Here’s a simple recipe to get you started:
- Prep your ingredients. Grab about 1 cup of dried fruits, 1 cup of nuts, and ½ cup of seeds or oats. You’ll also need ¼ cup of nut butter and 2 tablespoons of a sweetener like honey or maple syrup.
- Blend the base. Toss the dried fruits into a food processor and pulse until they form a sticky paste. This will act as the glue for your bars. If the mix looks too dry, add a teaspoon of water (just don’t overdo it, or things can get messy).
- Mix everything together. In a large bowl, combine the fruit paste, chopped nuts, seeds, and oats. Add the nut butter and sweetener, then mix until everything is evenly coated.
- Press into a pan. Line a small baking dish with parchment paper, then press the mixture firmly into an even layer. I like to use the back of a spoon or a flat measuring cup to really pack it down—this helps the bars hold their shape.
- Chill and slice. Pop the dish into the fridge for at least an hour to let everything firm up. Once set, slice into bars or squares. Store them in an airtight container in the fridge, and they’ll stay fresh for about a week (if they last that long!).
Essential Ingredients and Substitutions
One of the best things about these bars is how flexible the recipe is. Here’s a quick rundown of the essentials and their swaps:
- Dried Fruits: Dates are the classic choice because they’re sticky and sweet, but apricots, figs, or raisins work great too. If you’re cutting back on sugar, go for lower-sugar options like unsweetened cranberries.
- Nuts: Almonds, walnuts, and cashews are fan favorites, but feel free to use what you have. Allergic to nuts? Try sunflower seeds or pepitas for a nut-free version.
- Seeds/Oats: Chia seeds, flaxseeds, or even quinoa flakes add texture and nutrition. Oats are perfect for extra fiber.
- Nut Butter: Almond butter, peanut butter, or even tahini can work. For a lower-calorie option, use powdered peanut butter mixed with water.
- Sweeteners: Honey and maple syrup are the go-tos, but agave or even mashed banana can do the trick. Want to skip added sugars? A splash of vanilla extract can add flavor without the calories.
Tips for Adjusting the Calorie Count
If you’re watching your calorie intake, here are a few ways to lighten things up:
- Cut back on nuts. Nuts are calorie-dense, so swap some out for puffed rice or more oats. You’ll still get a nice texture but with fewer calories.
- Use less sweetener. Most recipes don’t need a full 2 tablespoons of honey or maple syrup. Start with 1 tablespoon and taste as you go.
- Go easy on nut butter. Nut butter adds creaminess but can be high in calories. Mix half the amount with a bit of water or use powdered nut butter instead.
- Smaller portions. Instead of cutting the bars into 10 pieces, slice them into 12 or 15 smaller squares. Same satisfaction, fewer calories per serving.
Tips for Customizing Your Fruit and Nut Bars
One of the best things about no-bake fruit and nut bars is how customizable they are. You can tweak the ingredients to fit your dietary needs, boost their nutrition, or just change up the flavors so you never get bored. Here are some tips and tricks I’ve learned (sometimes the hard way!) to make your bars exactly the way you want them.
Swapping Ingredients to Lower Calorie Content
Let’s be real—while fruit and nut bars are healthy, they can pack a calorie punch. But don’t worry, a few swaps can lighten them up without sacrificing flavor or texture.
- Reduce the nuts: Nuts are calorie-dense, so try replacing half of them with puffed rice, oats, or shredded coconut. These ingredients still add texture but with way fewer calories.
- Cut back on sweeteners: A lot of recipes call for a couple of tablespoons of honey, maple syrup, or agave. You can often get away with less or even skip it entirely if your dried fruits are sweet enough. Dates and apricots, for example, add plenty of natural sweetness on their own.
- Lighten up the nut butter: Nut butter is a binding hero, but it’s also calorie-heavy. Mix it with a bit of water or melted coconut oil to stretch it further. Alternatively, try powdered peanut butter, which has way fewer calories but still delivers that nutty flavor.
Adding Protein Powder or Superfoods for Extra Nutrition
Want to turn your bars into a serious powerhouse snack? Add a scoop of protein powder or sprinkle in some superfoods. These upgrades not only boost the nutritional value but also make the bars feel extra indulgent.
- Protein Powder: Use unflavored or vanilla protein powder for a subtle taste. Start with about 2 tablespoons and adjust the rest of the ingredients (like nut butter or sweeteners) to maintain the right consistency.
- Superfoods: Chia seeds, flaxseeds, and hemp hearts are great for adding fiber and omega-3s. Spirulina powder can give your bars a fun green tint, though the flavor is stronger, so use it sparingly.
- Cacao nibs or cocoa powder: If you’re a chocolate lover, this is a must. Cacao nibs add crunch, while cocoa powder gives that rich, chocolatey taste without extra sugar.
Pro tip: Be mindful of the flavors. For example, if you’re adding a bold superfood like maca powder, pair it with ingredients that can handle its earthy taste, like chocolate or almond butter.
Vegan and Gluten-Free Variations
Good news—these bars are naturally easy to make vegan or gluten-free with just a couple of tweaks!
- Vegan substitutions: Swap honey for maple syrup, agave nectar, or date syrup. They’re just as sticky and sweet, so you won’t miss a thing.
- Gluten-free swaps: Make sure your oats are certified gluten-free if you’re adding them. While oats are naturally gluten-free, cross-contamination can be an issue.
- Experiment with plant-based proteins: If you want to add protein powder, opt for a vegan option like pea protein or hemp protein.
A Few Fun Customizations to Try
If you’re feeling adventurous, here are a few combinations that have worked like magic for me:
- Tropical twist: Use dried pineapple, shredded coconut, and macadamia nuts, with a touch of lime zest for a summery vibe.
- Chocolate-peanut butter: Add a tablespoon of cocoa powder and a handful of mini chocolate chips—classic and irresistible.
- Berry blast: Mix dried cranberries, blueberries, and chopped pecans for a tart yet sweet treat.
Customizing your fruit and nut bars is where the fun begins. Whether you’re tweaking the recipe to fit your health goals or just experimenting with flavors, the possibilities are endless. And the best part? Even if a batch doesn’t turn out perfectly, it’s still going to taste good—trust me on this one. So grab your ingredients and get creative—you’ve got this!
Storing and Serving Your No-Bake Bars
Once you’ve made your delicious no-bake fruit and nut bars, the last thing you want is for them to dry out, crumble, or lose their flavor. Proper storage is key to keeping them fresh and tasty. Plus, portioning and serving them the right way ensures you get the most out of your snack. Let’s talk about how to store these bars, control portions, and pair them with other healthy snacks to create a well-rounded treat.
Best Storage Methods to Keep Them Fresh
No-bake bars are pretty low-maintenance when it comes to storage, but there are a few tricks to keep them at their best.
- Fridge is your friend: Store the bars in an airtight container in the refrigerator. The cool temperature helps them stay firm and prevents ingredients like nut butter or dried fruits from becoming too sticky. Properly stored, they’ll stay fresh for up to 7 days.
- Layering matters: If you’re stacking the bars, place parchment or wax paper between layers. This prevents them from sticking together and keeps their texture intact.
- Freezer option: Want to make a big batch? Freeze them! Wrap each bar individually in plastic wrap or parchment paper, then place them in a freezer-safe bag or container. They’ll last up to 3 months in the freezer. Just thaw a bar in the fridge or at room temperature for about 10 minutes before eating.
How to Portion Correctly to Control Calorie Intake
When it comes to portioning, it’s easy to get carried away. (Trust me, I’ve been there, cutting massive squares that were more like dessert than a snack.)
- Measure before you mix: To make portioning easier, decide how many bars you want to make before pressing the mixture into the pan. For instance, if the recipe yields 10 servings and you’re aiming for 150 calories per bar, use a ruler to evenly score the mixture into 10 pieces.
- Size matters: A standard portion size is about 1.5 to 2 ounces, which is roughly the size of a granola bar or two fingers wide. If you’re cutting down on calories, consider making smaller bites—perfect for satisfying a quick craving without overindulging.
- Pre-wrap for convenience: If you’re someone who’s always on the go, wrapping individual portions in parchment paper or plastic wrap is a lifesaver. This not only helps with portion control but also makes it easy to grab a healthy snack when you’re in a rush.
Serving Suggestions for Pairing with Other Healthy Snacks
While these bars are already a powerhouse snack on their own, pairing them with other foods can turn them into a mini-meal or give you an extra nutrient boost.
- With fresh fruit: Pair your bar with a handful of berries, apple slices, or orange segments for an added dose of vitamins and fiber. The fresh fruit balances out the sweetness of the dried fruits in the bars.
- With yogurt: Crumble a bar over a bowl of Greek yogurt for a satisfying breakfast or post-workout snack. You’ll get a good mix of protein, carbs, and healthy fats to keep you energized.
- With a warm drink: Enjoy a bar alongside a cup of green tea, herbal tea, or black coffee for a comforting afternoon pick-me-up. The nutty flavors pair beautifully with the earthy notes of tea or coffee.
- Pre-workout pairing: If you’re fueling up before exercise, try eating a bar with a small banana or a few slices of avocado. This combo provides quick energy (from the carbs) and sustained energy (from the healthy fats).
Storing and serving no-bake fruit and nut bars doesn’t have to be complicated, but a little thought goes a long way. With proper storage, your bars will stay fresh and delicious, and smart portioning ensures you don’t accidentally overdo it. Pair them with other healthy foods, and you’ve got yourself a snack that’s as versatile as it is satisfying. Honestly, it’s hard not to feel a little proud every time you reach for one of these homemade treats!
Comparing Store-Bought vs. Homemade Options
When it comes to no-bake fruit and nut bars, you’ve got two main options: make them yourself or buy them ready-made from the store. Both have their pros and cons, but if you’re trying to eat healthier or save money, the choice becomes pretty clear. Let’s break it all down—calories, cost, customization, and how to navigate the store shelves if you go the pre-made route.
Calorie Differences Between Store-Bought and Homemade Bars
Store-bought bars are often marketed as “healthy,” but not all of them are as wholesome as they seem. One of the biggest culprits? Hidden sugars and additives.
- Store-bought bars: Many brands pack their bars with added sugars like cane syrup, glucose, or “natural flavors” (whatever that means). This can bump the calorie count to anywhere from 200 to 300 calories per bar, with some brands sneaking in even more. Plus, the portion sizes can be misleading—what looks like a single bar might actually be two servings.
- Homemade bars: When you make your own, you have full control over the ingredients. Want to cut back on sweeteners or use lighter ingredients? Go for it. A typical homemade bar can be as low as 150 calories, depending on your recipe. And the best part? No mystery ingredients.
I once compared a homemade bar I made (186 calories with dates, oats, and almonds) to a popular store brand claiming to be “clean.” That store-bought bar had 280 calories and over 12 grams of added sugar. Yikes.
Advantages of Making Your Own
Making your own bars has so many perks, and honestly, it’s kind of fun, too.
- Cost: A batch of homemade bars costs significantly less than buying individual store-bought ones. Think about it—most of the ingredients, like oats, dried fruits, and nuts, are pantry staples that you can buy in bulk. A single bar from the store can cost $2–$3, but a homemade bar might cost less than $1.
- Customization: Want a vegan bar? Done. Prefer lower-calorie options? Easy. Love a specific flavor combo like chocolate and coconut? You can tailor every batch to your liking. Plus, you can experiment with ingredients like protein powder, seeds, or unique spices (hello, cinnamon-cardamom combo!).
- Control over ingredients: When you make your own bars, you skip the preservatives, added sugars, and artificial flavors. You know exactly what’s going into them, which is great if you have dietary restrictions or just want to eat clean.
Tips for Choosing the Healthiest Store-Bought Options
Sometimes, making your own bars isn’t practical. We’ve all been there—busy week, no time, no energy. In those cases, it’s all about choosing the best options from the store shelves.
- Read the ingredient list: Look for bars with whole, recognizable ingredients like dates, nuts, and seeds. The fewer the ingredients, the better. Avoid bars with a long list of additives or ingredients you can’t pronounce.
- Check the sugar content: Aim for bars with less than 8 grams of sugar per serving—and make sure it’s coming from natural sources like dates or raisins, not added sugars.
- Watch the calorie count: Stick to bars that fall between 150 and 250 calories, depending on your needs. If you’re looking for a quick snack, a lighter bar might be better. For a meal replacement, something higher in calories and protein works well.
- Prioritize protein and fiber: A good bar should have at least 3–5 grams of fiber and 5–10 grams of protein. These nutrients keep you fuller longer and provide sustained energy.
Some great brands focus on simple, wholesome ingredients, but they can be pricier. So, if you’re grabbing a store-bought bar, think of it as a convenience treat rather than a daily staple.
Frequently Asked Questions About No-Bake Fruit and Nut Bars
If you’re new to the world of no-bake fruit and nut bars, you probably have a few questions. Don’t worry, I’ve been there—wondering if I could skip the sweeteners, which nuts to use, or how to nail down the calorie count without feeling like a math whiz. Let’s tackle some of the most common questions to help you make the perfect batch every time.
Can You Make These Bars Without Added Sugar?
Absolutely! The beauty of no-bake fruit and nut bars is how naturally sweet they can be, thanks to dried fruits like dates, apricots, or raisins. These fruits pack plenty of natural sugar, so there’s usually no need for extra honey, maple syrup, or other sweeteners.
If you’re trying to cut back on sugar altogether, stick to lower-sugar dried fruits like unsweetened cranberries or cherries. Just make sure to check the label—some brands sneak in added sugars even when it’s not obvious.
One time, I skipped all added sweeteners and used just dates and almond butter in my recipe. The bars turned out perfectly sticky and sweet, and I didn’t even miss the honey. Pro tip: if your mix seems too dry without sweeteners, add a splash of warm water or unsweetened almond milk to help everything bind together.
What’s the Lowest-Calorie Nut to Use?
Not all nuts are created equal when it comes to calorie count. Here’s a quick breakdown of popular options (per 1 ounce, or about a small handful):
- Almonds: ~160 calories
- Cashews: ~155 calories
- Pistachios: ~160 calories
- Walnuts: ~185 calories
- Macadamia nuts: ~200 calories
If you’re looking to keep the calorie count down, cashews and pistachios are excellent choices. They’re on the lower end of the calorie spectrum and still pack plenty of flavor and nutrition. Bonus: pistachios have a satisfying crunch, which adds great texture to your bars.
That said, don’t shy away from nuts with higher calorie counts, like walnuts or macadamias, if you love their flavor. Healthy fats are an important part of your diet, and the rich, creamy taste of these nuts can make your bars feel extra indulgent.
How Do You Calculate the Exact Calorie Count for Homemade Bars?
Calculating the calorie count for homemade bars might seem intimidating, but it’s actually pretty straightforward. Here’s how I do it:
- List all your ingredients and their amounts. Write down everything you’re using, including exact measurements (e.g., 1 cup of almonds, 1/2 cup of dates, 2 tablespoons of honey).
- Find the calorie count for each ingredient. Use a reliable resource like the USDA database or the packaging labels. For example:
- Almonds (1 cup): ~530 calories
- Dates (1/2 cup): ~200 calories
- Honey (2 tablespoons): ~120 calories
- Add it all up. Sum up the total calories for all the ingredients in your recipe.
- Divide by the number of bars. If your batch makes 10 bars, divide the total calorie count by 10 to find the calories per serving.
For example, if your total calorie count is 2,000 for the whole recipe, and you cut it into 10 bars, each bar will have 200 calories.
Pro tip: If you’re experimenting with new ingredients, try using a free nutrition calculator app or website to save time. I use them all the time, especially when I’m swapping ingredients and want to double-check the math.
No-bake fruit and nut bars are a snack you can feel good about! Whether you’re counting calories or simply looking for a nutritious treat, these bars are a versatile option that fits any lifestyle. By making them at home, you control the ingredients, calorie count, and flavor profile. Ready to try your hand at crafting the perfect snack? Dive into the recipe and enjoy the health benefits of these nutrient-packed bars!


