Who doesn’t love a cake that’s not only bursting with flavor but also has that perfect moist texture? Pineapple juice cake is a tropical dream come true, and getting it just right can feel like a science—and an art. But here’s the good news: it’s easier than you think! The secret lies in a few key ingredients and techniques that ensure every bite is juicy, tender, and packed with tropical goodness. In this article, we’ll explore what makes pineapple juice cake moist and flavorful, including expert tips, common mistakes to avoid, and even some fun twists to try at home. Let’s dive into this sweet journey together!
Table of contents
Why Pineapple Juice is the Star Ingredient
If you’ve ever bitten into a pineapple juice cake and thought, Wow, this is insanely moist and flavorful, you’re not imagining things—pineapple juice really is the secret hero here! It’s not just about adding a splash of tropical flair; there’s actual science and flavor magic happening in your cake batter. Let me tell you why this ingredient deserves top billing in your recipe.
Pineapple Juice: The Moisture Magnet
The first time I made pineapple juice cake, I didn’t fully get why the juice was such a big deal. I figured, It’s just liquid, right? Water could probably do the same thing. Oh, how wrong I was! Pineapple juice brings natural sugars and a unique viscosity that water just can’t compete with. When the cake bakes, these sugars lock in moisture, almost creating a self-sustaining sponge. The result? A tender, melt-in-your-mouth texture that doesn’t dry out, even after a couple of days.
Pro tip: Use 100% pure pineapple juice, not the sugary concentrate stuff. Trust me, I made that mistake once, and the cake turned out cloyingly sweet—not what you’re going for.
The Magic of Natural Acidity
Here’s where pineapple juice really flexes its muscle: it’s naturally acidic. Why does that matter? Acidity breaks down the proteins in flour and tenderizes the gluten, leaving your cake with a softer crumb. Think of it as a built-in hack for texture perfection. I used to wonder why my cakes would sometimes feel dense and chewy—not ideal. But once I started incorporating acidic ingredients like pineapple juice, it was like flipping a switch.
And here’s another bonus: acidity reacts beautifully with baking soda or baking powder. That reaction helps create those tiny air bubbles that give your cake a light, fluffy rise. So if you’re aiming for a cake that’s both moist and airy, pineapple juice has your back.
The Tropical Aroma and Sweetness
Let’s talk about flavor, because honestly, this is where pineapple juice truly shines. It’s not just sweet—it’s vibrant, bright, and unmistakably tropical. When the cake is baking, your whole kitchen fills with this incredible aroma that’ll have everyone asking what’s in the oven.
And here’s the best part: that sweetness isn’t overpowering. It’s balanced by just the right amount of tanginess, so the cake doesn’t taste one-note. I’ve experimented with fresh pineapple juice versus canned, and while both work, fresh juice amps up the natural aroma and flavor. If you can, go fresh—it’s worth the extra step.
A Quick Aside: Why Pineapple Juice Beats Water or Milk
I know what you’re thinking: Can’t I just use milk or water instead? Well, sure, you can, but it’s not the same. Water brings nothing to the flavor party, and milk, while creamy, doesn’t have that acidic edge. Pineapple juice is like the triple threat of baking: it adds moisture, enhances texture, and delivers flavor all at once. That’s a win-win-win in my book.
The Perfect Balance of Ingredients
Getting the ingredients just right in a pineapple juice cake isn’t just about following a recipe—it’s about understanding how each element plays its role in creating a cake that’s moist, tender, and full of tropical flavor. Trust me, I’ve had my share of lopsided cakes and overly dense disasters before finally figuring out how to strike that perfect balance. Let’s break it down!
Choosing the Right Flour for a Tender Crumb
Flour is one of those ingredients that seems straightforward, but it can make or break your cake’s texture. For pineapple juice cake, all-purpose flour is usually the go-to. Why? It has just the right amount of protein to create structure without making the crumb too dense.
One time, I thought substituting bread flour would give the cake a sturdier texture. Big mistake—it was like eating a pineapple-flavored brick. On the flip side, I’ve also tried cake flour, and while it made the crumb super soft, it almost collapsed under the weight of the pineapple juice. All-purpose flour strikes that happy medium where the cake is tender yet sturdy enough to hold its shape.
Pro tip: Always sift your flour to avoid lumps. Pineapple juice has enough texture of its own—you don’t want clumps of flour messing with that.
Why Adding Oil or Butter Makes a Difference
Ah, the age-old debate: oil or butter? Honestly, both have their merits, but for pineapple juice cake, I lean toward oil. Oil is liquid at room temperature, which means it keeps the cake moist long after it’s cooled. Butter, on the other hand, adds richness but can sometimes make the cake feel a bit heavy.
I once experimented with half oil and half melted butter, and it was a game-changer. The butter gave that signature flavor, while the oil locked in the moisture. If you’re feeling fancy, try coconut oil—it pairs beautifully with the pineapple for a real tropical vibe.
The Importance of Sugar and Its Impact on Flavor
Let’s be real—sugar isn’t just there for sweetness. It’s a key player in creating structure and enhancing flavor. For pineapple juice cake, I like to use a mix of granulated sugar and brown sugar. The granulated sugar keeps the cake light, while the brown sugar adds depth and a slight caramel note that complements the pineapple.
One time, I got overly creative and cut back on the sugar, thinking the pineapple juice would make up for it. Nope. The cake turned out bland and didn’t brown properly because sugar also helps with caramelization. Moral of the story: don’t skimp on sugar unless you’re okay with a cake that’s missing its mojo.
Using Fresh Pineapple Versus Canned for Added Richness
Here’s the deal: both fresh and canned pineapple have their place in baking, but they bring different things to the table. Fresh pineapple adds a vibrant, almost zesty flavor that really pops, while canned pineapple is sweeter and more uniform in texture.
I usually stick to fresh pineapple for the juice—it’s a bit tangier and less syrupy, which makes the cake feel lighter. But for mix-ins, like crushed pineapple chunks, canned is often more convenient and consistent. Just make sure to drain it well; nobody wants a soggy cake!
Baking Techniques to Lock in Moisture
When it comes to pineapple juice cake, nailing the baking process is just as important as getting the ingredients right. The best recipe in the world can fall flat—literally—if you don’t bake it with care. Here’s the good news: locking in moisture is easier than you think when you know the right tricks. Let’s dive into some tried-and-true techniques I’ve learned through (sometimes painful) trial and error.
Prepping Your Cake Pan for Even Baking
Okay, confession time: I used to skip properly prepping my cake pan because I thought it wasn’t a big deal. Big mistake. My cakes would stick, bake unevenly, or develop weird crusty edges—none of which scream “moist and delicious.”
Here’s what works: grease your pan generously with butter or oil, then dust it lightly with flour. If you’re using a bundt pan, don’t even think about skipping this step—those grooves are cake traps waiting to happen. For extra insurance, line the bottom with parchment paper. It might feel like overkill, but trust me, it’s worth it when your cake slides out perfectly.
Pro tip: Use a light-colored metal pan. Dark pans absorb more heat, which can dry out the edges of your cake before the center is done.
Using Low-Temperature Baking to Prevent Dryness
One of the best hacks for a moist pineapple juice cake? Lower your oven temperature. High heat can cause the cake’s exterior to cook too quickly, leaving the inside underdone—or worse, dry.
I’ve found that baking at 325°F instead of the typical 350°F makes a world of difference. The lower temperature allows the cake to bake more evenly, so the moisture stays locked in throughout. Sure, it takes a little longer, but patience is a small price to pay for a cake that’s soft and tender.
And here’s a bonus trick: place a shallow pan of water on the lower rack of your oven. The steam it creates helps keep the air inside moist, which means your cake will stay moist, too.
Tips for Checking Doneness Without Overbaking
Let me tell you, overbaking is the ultimate cake killer. I’ve done it more times than I’d like to admit, and the result is always the same: a dry, crumbly disappointment. The key is knowing exactly when your cake is done—and no, just eyeballing it isn’t enough.
Start testing your cake a few minutes before the recommended bake time is up. Insert a toothpick into the center—if it comes out with a few moist crumbs, you’re golden. If it’s clean, you’ve probably gone too far.
Another trick? Gently press the center of the cake with your finger. If it springs back lightly, it’s done. If it leaves an indentation, it needs a few more minutes. And if you see the edges pulling away from the sides of the pan, that’s your final warning sign—it’s ready to come out!
Enhancing Flavor with Creative Additions
Pineapple juice cake is already a winner in the flavor department, but sometimes, you just want to take things up a notch. The beauty of this cake is its versatility—you can easily customize it to fit your mood, your guests, or even just what’s in your pantry. Over the years, I’ve experimented with all kinds of additions, and let me tell you, the right extras can turn an already delicious cake into a showstopper.
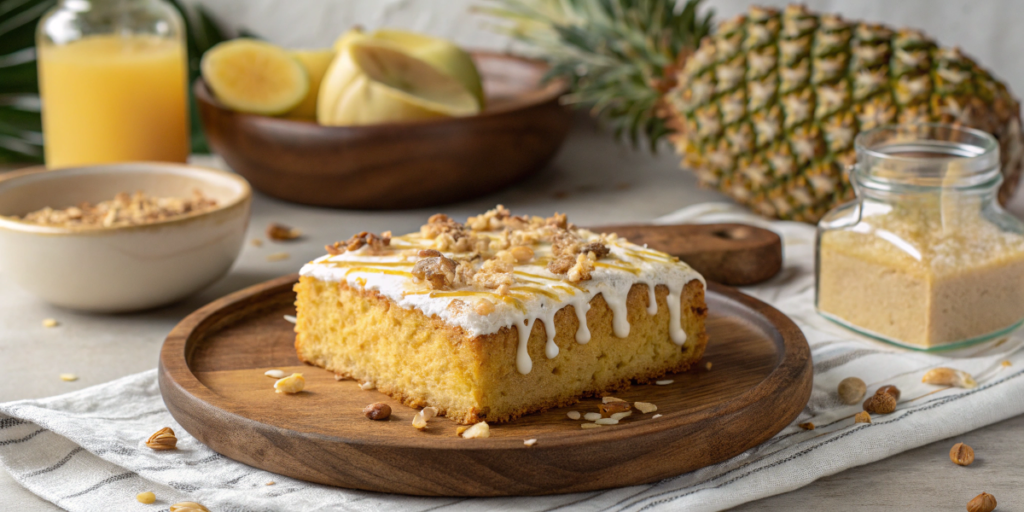
Adding Shredded Coconut or Crushed Nuts for Texture
Let’s start with texture because, honestly, it’s such an underrated part of a great cake. The first time I added shredded coconut to my pineapple juice cake, it felt like I’d stumbled onto some tropical paradise. Coconut not only enhances the flavor with its subtle sweetness, but it also adds a lovely chewiness to every bite.
If you’re not a coconut fan, crushed nuts are another fantastic option. Pecans and walnuts work especially well because their slightly buttery, earthy flavor complements the pineapple beautifully. Just be sure to toast the nuts before adding them to your batter—it brings out their flavor and keeps them crunchy.
Pro tip: Fold your mix-ins into the batter gently to avoid overmixing. Nobody wants a tough cake!
Spicing It Up with Cinnamon or Nutmeg
Sometimes, it’s the simplest additions that make the biggest difference. A pinch of cinnamon or nutmeg can completely transform your pineapple juice cake, adding warmth and depth to the flavor.
I remember being skeptical the first time I sprinkled cinnamon into the batter. I thought, Is this going to overpower the pineapple? But it didn’t—it actually made the pineapple’s brightness pop even more. Nutmeg, on the other hand, adds a subtle, almost nutty aroma that pairs beautifully with the tropical sweetness.
If you’re feeling adventurous, try a mix of both spices, or even a dash of ground ginger for a little zing. Just don’t go overboard—a teaspoon or less is all you need to keep the flavors balanced.
Incorporating Cream Cheese Glaze or Pineapple Syrup as a Topping
Now, let’s talk toppings because, honestly, they’re the cherry on top (or, in this case, the glaze on top). Cream cheese glaze is my go-to when I want something rich and tangy to complement the cake’s sweetness. Just whip up a simple mix of cream cheese, powdered sugar, and a splash of pineapple juice for a drizzle that’s as gorgeous as it is delicious.
For a lighter, more tropical vibe, pineapple syrup is another winner. It’s super easy to make—just simmer pineapple juice with a bit of sugar until it thickens into a syrupy consistency. Brush it over the warm cake to let it soak in, or drizzle it on top just before serving for that extra burst of pineapple goodness.
Pro tip: Pair the glaze or syrup with some toasted coconut flakes or chopped nuts for a finishing touch that looks and tastes amazing.
Common Mistakes to Avoid
Even the most experienced bakers make mistakes, and when it comes to pineapple juice cake, a few common pitfalls can turn a potentially moist, flavorful dessert into a dry, dense disappointment. I’ve made every mistake in the book (sometimes twice), but each one taught me something that saved future cakes. Here’s what I’ve learned to avoid so you can get it right the first time!
Overmixing the Batter and How It Affects the Cake
This is one of the easiest mistakes to make—and one of the hardest to fix once it’s done. Overmixing your batter can seem harmless at first. After all, doesn’t a smooth batter mean a better cake? Unfortunately, no. When you mix too much, you activate the gluten in the flour, and instead of a light, tender crumb, you end up with a tough, rubbery texture.
I learned this the hard way when I tried “whipping” my batter to get rid of lumps. The cake came out dense and chewy, and even the pineapple juice couldn’t save it. Now, I mix just until the ingredients are combined. Lumps are fine—they’ll work themselves out in the oven!
Pro tip: Use a spatula instead of a mixer for the final steps of combining the wet and dry ingredients. It gives you more control and reduces the risk of overmixing.
Skipping the Pineapple Juice Soak—Why It’s Essential
If there’s one step you should never skip, it’s the pineapple juice soak. This isn’t just a fancy extra—it’s the key to a moist cake that bursts with flavor. After baking, the warm cake is like a sponge, ready to soak up all that juicy goodness. Without it, you’re missing out on a layer of moisture and a concentrated hit of pineapple flavor.
I’ll admit, I once thought my cake was “moist enough” and skipped this step to save time. Big mistake. The cake was fine, but it lacked the wow factor that comes with that pineapple-infused burst in every bite. Now, I poke holes in the cake with a skewer and drizzle pineapple juice over the top while it’s still warm. Game changer!
Pro tip: Use a small ladle or spoon to evenly distribute the juice, and don’t be afraid to get generous—it soaks in beautifully.
Using the Wrong Baking Tools (Like a Non-Stick Pan)
When it comes to pineapple juice cake, not all pans are created equal. I once baked this cake in a dark non-stick pan, thinking it would give me a nice, even bake. Nope. The edges browned way too quickly, and by the time the center was done, the outside was overcooked and dry.
Light-colored metal pans are the way to go. They reflect heat more evenly, so your cake bakes uniformly without any crispy edges. And while silicone pans might seem like a good idea for easy release, they don’t conduct heat as effectively, which can leave your cake undercooked in spots.
Pro tip: If you’re using a bundt pan, go for one with a non-stick coating but still grease and flour it thoroughly. Pineapple juice cakes can be sticky, and you don’t want to leave half your masterpiece in the pan!
Learn From Mistakes
Mistakes happen, and that’s okay—it’s all part of the baking journey. Whether it’s a dense cake from overmixing, a dry one from skipping the soak, or uneven baking from the wrong pan, each misstep teaches you how to do better next time. With a little care and attention to these common pitfalls, your pineapple juice cake will come out moist, flavorful, and utterly irresistible every time. So go ahead, bake with confidence—and maybe keep a little extra pineapple juice on hand, just in case!
Serving and Storing Your Pineapple Juice Cake
You’ve baked the perfect pineapple juice cake—moist, flavorful, and irresistible. But what’s the best way to serve it to showcase all that tropical goodness? And how do you make sure leftovers stay as delicious as the day you baked it? Let’s dive into some practical tips for serving, storing, and even freezing your cake so every bite is as dreamy as the first.
The Best Ways to Serve It Fresh and Warm
There’s something magical about serving pineapple juice cake while it’s still warm. The cake is extra tender, the flavors are at their peak, and if you’ve added a pineapple syrup or glaze, it practically melts into the sponge. I like to serve it straight out of the oven (after cooling for about 10 minutes) with a scoop of vanilla ice cream or a dollop of freshly whipped cream. The contrast between the warm cake and the cold topping is chef’s kiss.
If you’ve gone for a cream cheese glaze, wait until the cake has cooled a little more—around 20–30 minutes—before drizzling it on top. This way, the glaze won’t slide right off, but the cake will still have that just-baked warmth.
Pro tip: Sprinkle some toasted coconut or crushed nuts over the glaze right before serving for a little extra texture and flavor.
How to Store Leftovers to Retain Moisture
Leftovers? Lucky you! Storing pineapple juice cake properly is key to keeping it moist and flavorful for days. Once the cake has completely cooled, wrap it tightly in plastic wrap or store it in an airtight container. The key is to minimize exposure to air, which can dry out the cake.
If you’ve already added a glaze or syrup, don’t worry—it actually helps lock in moisture. Just make sure your container is leak-proof to avoid sticky surprises. Stored at room temperature, the cake will stay fresh for up to two days. For longer storage, pop it in the fridge, where it’ll keep for up to a week.
Pro tip: Before serving refrigerated cake, let it sit at room temperature for about 30 minutes to bring back some of that soft, moist texture.
Freezing Tips for Long-Term Storage Without Losing Flavor
Pineapple juice cake freezes beautifully, which means you can bake ahead or save leftovers for a rainy day. To freeze, first let the cake cool completely (this is non-negotiable—freezing warm cake creates ice crystals that mess with the texture). Wrap the cake tightly in plastic wrap, then a layer of aluminum foil for extra protection. If you’ve made a large cake, consider slicing it into individual portions before freezing for easy thawing later.
When you’re ready to enjoy it again, thaw the cake in the fridge overnight or at room temperature for a few hours. To bring back that just-baked vibe, warm it in the oven at 300°F for about 10 minutes. If you’ve got some extra glaze or syrup on hand, drizzle it on after reheating to freshen up the flavor.
Pro tip: Label your wrapped cake with the date so you don’t forget how long it’s been in the freezer (even though it probably won’t last long!). Frozen pineapple juice cake is best enjoyed within 2–3 months.
Pineapple juice cake is a celebration of tropical flavors and heavenly textures when done right. The secret lies in using pineapple juice strategically to lock in moisture and elevate the cake’s flavor. Pair that with the perfect balance of ingredients, mindful baking techniques, and creative add-ons, and you’ve got a dessert everyone will rave about. So, why not try your hand at making this irresistible treat? Let us know how it turns out—and don’t forget to enjoy every bite of your moist, flavorful masterpiece!


