Have you ever pulled your baked chicken out of the oven, only to find the cheddar sliding off or pooling at the bottom of the pan? Frustrating, right? I’ve been there too! Whether you’re prepping a crispy cheddar-crusted chicken breast or a cheesy baked dish, getting that cheddar to stick can feel like a culinary challenge. But don’t worry—you’re not alone in this, and there’s a science (and art) to solving it. In this guide, I’ll share proven tips, tricks, and techniques to make sure your cheddar stays exactly where it belongs: beautifully melted and stuck to your chicken. Let’s dive in!
Table of contents
- Why Does Cheddar Sometimes Slide Off While Baking?
- Prepping the Chicken for Better Cheese Adhesion
- Choosing the Right Type of Cheddar for Baking Success
- Techniques for Ensuring Cheddar Sticks While Baking
- Baking Tips for Perfectly Cheesy Chicken
- Common Mistakes to Avoid
- Creative Cheddar Coating Ideas for Chicken Recipes
Why Does Cheddar Sometimes Slide Off While Baking?
Oh, cheddar, why must you betray us mid-bake? If you’ve ever opened the oven to find your beautifully envisioned cheesy chicken has turned into a sad pile of melted cheddar at the bottom of the pan, trust me, you’re not alone. This is one of those kitchen mishaps that feels so avoidable—yet it happens to the best of us. I’ve been there, watching my dreams of a perfectly cheesy crust melt away (literally). Let’s talk about why this happens and, more importantly, how to stop it.
The Usual Suspects: Common Reasons Cheddar Doesn’t Stick
One big culprit? Moisture. Chicken, especially if it hasn’t been prepped properly, can be surprisingly wet. All that extra moisture creates a slippery surface, making it nearly impossible for cheese to hold on. Think about it: even the best adhesive can’t stick to a damp surface. Patting your chicken dry is a small but mighty step that solves half the battle.
Another sneaky issue is uneven surfaces. If your chicken is bumpy or uneven, the cheese doesn’t have a solid place to latch on. Ever tried stacking blocks on a wobbly table? Same idea. Cheese slides right off when things aren’t level. This is especially true if you’re using shredded cheese—it loves finding those little gaps and falling through.
And, of course, there’s heat. If your oven is too hot, the cheese can melt too quickly before it has a chance to properly bond with the chicken. Instead of sticking, it just turns into a molten puddle. It’s like the cheese is in a rush to escape—dramatic, right?
The Role of Preparation: Setting Up for Success
Here’s the thing: getting cheddar to stay put starts way before you even turn on the oven. First, pat your chicken dry. Seriously, grab a few paper towels and get rid of that excess moisture. It might seem tedious, but trust me, it makes a world of difference.
Next, think about creating a “sticky” base layer. This could be as simple as brushing on a thin coat of mayonnaise, mustard, or even an egg wash. These act like glue for your cheese, giving it something to grip onto. Breadcrumbs or flour can also help, especially if you’re going for a crispy finish. Bonus: they add texture and flavor too!
Choosing the Right Cheese Matters
Not all cheddar is created equal. Extra-sharp cheddar might taste amazing, but it can be a bit crumbly and harder to work with. Mild or sharp cheddar tends to have a creamier texture, which melts and sticks better. And don’t even get me started on pre-shredded cheese. While it’s convenient, it’s often coated in anti-caking agents that can make it less sticky. If you have the time, shred your cheese fresh—it’s worth the effort.
Prepping the Chicken for Better Cheese Adhesion
If you’ve ever been frustrated watching your cheddar slide off chicken like a failed science experiment, let me tell you, the secret is in the prep work. I learned this the hard way after one too many cheesy disasters in the oven. It turns out, getting that cheddar to stick is less about magic and more about preparation. Here’s how to set your chicken up for success.
Patting Chicken Dry: Say Goodbye to Excess Moisture
First things first—moisture is your enemy. Chicken fresh out of the package is usually coated in juices, which makes it a slippery surface for cheese to cling to. Grab some paper towels and gently pat each piece of chicken dry. Think of it like giving the chicken a little spa treatment—it might seem tedious, but trust me, it’s worth it.
I used to skip this step because, well, who has the patience? But I’ll never forget the time I tried to coat a soggy chicken breast in cheese. It was a disaster. The cheddar slid right off before I even got it in the oven! Now, I always take the time to dry it thoroughly, and it’s made all the difference. Dry chicken = happy cheese.
Creating a Base Layer: The Glue That Holds It All Together
Once your chicken is dry, it’s time to create a “sticky” surface for the cheese. Think of this like primer before paint—it helps everything adhere better. You have a few options here, and honestly, it depends on your flavor goals.
- Flour or Breadcrumbs: Lightly dusting your chicken with flour or breadcrumbs creates texture, which gives the cheese something to hold onto. Plus, it adds a delicious crunch if you’re going for that crispy vibe.
- Egg Wash or Mustard: For a stronger adhesive, try brushing on a thin layer of egg wash or even mustard. The egg acts like glue, while mustard adds a tangy kick.
- Mayonnaise or Yogurt Marinade: My personal favorite is a thin coat of mayo or a yogurt-based marinade. Not only does it stick like a dream, but it also keeps the chicken moist and adds flavor. Win-win, right?
The key here is to keep it light. You want just enough to create a tacky surface—not a messy, goopy layer that overwhelms the chicken.
Scoring the Chicken: Extra Grip for the Cheese
Here’s a trick I didn’t learn until recently: lightly scoring the surface of the chicken. It’s a simple technique—just use a sharp knife to make shallow cuts across the top of the chicken breast. These tiny grooves give the cheese even more places to cling to, almost like little pockets.
I’ll admit, I was skeptical when I first tried this. But after giving it a go, I was hooked. The cheddar stayed put, and it even helped the chicken cook more evenly. Just be careful not to cut too deep; you don’t want to slice all the way through.
Choosing the Right Type of Cheddar for Baking Success
Not all cheddar is created equal—trust me, I learned this the hard way. When I first started baking with cheddar, I thought, “Cheese is cheese, right?” Oh, how wrong I was! The type of cheddar you choose can make or break your dish, especially if you’re aiming for it to stick to chicken like a cheesy masterpiece. Let’s dive into the differences and figure out what works best.
Sharp, Mild, or Extra-Sharp: Which One Reigns Supreme?
Cheddar comes in a range of flavors and textures, from mild to extra-sharp, and while they all taste amazing, their baking behavior varies a lot.
- Mild Cheddar: This is the creamy, mellow cheddar that melts like a dream. Its smooth texture makes it an excellent choice for sticking to chicken, as it spreads evenly without being crumbly. If you want foolproof results, mild cheddar is your BFF.
- Sharp Cheddar: This one strikes a balance—more flavor than mild but still creamy enough to melt well. It’s my go-to for recipes where I want a cheesy punch without sacrificing adhesion.
- Extra-Sharp Cheddar: Okay, I love the flavor of extra-sharp cheddar, but I have to admit, it can be tricky for baking. It’s drier and crumblier, which makes it harder to stick to surfaces. If you’re set on using extra-sharp, consider mixing it with a bit of mild cheddar to balance things out.
Pro tip: Always grate your cheddar fresh, regardless of type. It just melts better—more on that below!
Shredded, Sliced, or Grated: Does It Really Matter?
Yes, it absolutely does! The form of cheddar you use can directly impact how well it adheres to your chicken.
- Shredded Cheddar: Shredded cheese is a popular choice because it melts quickly and covers evenly. However, freshly shredded cheddar will stick better than pre-shredded (more on that in a sec).
- Sliced Cheddar: Slices are great if you’re layering cheese on top of chicken, but they can sometimes slide off during baking, especially if the surface isn’t prepped properly. If you go this route, press the slices firmly into the chicken or use a sticky base layer like an egg wash.
- Grated Cheddar: Grated cheddar is the unsung hero of cheesy baking. The smaller pieces melt into every nook and cranny, creating an even coating that sticks beautifully. If you’ve got a box grater handy, this is the way to go.
Why Pre-Shredded Cheese Isn’t the Best Choice
I’ll be honest, I used to grab those handy bags of pre-shredded cheddar without a second thought. But here’s the thing: pre-shredded cheese is coated in anti-caking agents like cellulose to keep it from clumping. While that’s great for convenience, it’s not so great for melting. These coatings can create a barrier that prevents the cheese from fully adhering to the chicken.
The first time I shredded my own cheese, I was blown away by the difference. Not only did it stick better, but it also melted into this gooey, irresistible layer that made my baked chicken look (and taste) like something out of a food magazine. It might take a few extra minutes, but shredding your own cheese is 100% worth it.
Techniques for Ensuring Cheddar Sticks While Baking
If you’re tired of watching your cheddar slide off chicken like it’s trying to escape, don’t worry—I’ve been there, too. The good news is that with a few smart techniques, you can make sure your cheese stays put, melts perfectly, and looks like a cheesy dream straight out of a cooking show. Here are some tried-and-true tricks to make that happen.
Use an Adhesive Layer: Egg Wash, Mayo, or Mustard
One of the simplest ways to get cheddar to stick is by creating an adhesive layer. Think of this as glue for your cheese. Without it, the cheddar has nothing to hold onto, especially on a smooth chicken surface.
- Egg Wash: Whisk up an egg or two and lightly brush it over your chicken before adding the cheese. The protein in the egg acts like a natural adhesive, helping the cheese cling tightly as it bakes. It’s quick, effective, and doesn’t add much flavor, making it a great neutral option.
- Mayonnaise: I know, it sounds unconventional, but mayo works wonders! Spread a thin layer of mayonnaise over the chicken. It not only helps the cheese stick but also keeps the chicken juicy and adds a subtle tangy flavor. Trust me, it’s a game-changer.
- Mustard: For a little extra zing, try using mustard as your base. Dijon works beautifully if you’re feeling fancy, or go for plain yellow mustard if you prefer a mild kick. Just a light coat is enough to lock the cheese in place.
Personally, I’m a mayo enthusiast—it’s never let me down. Plus, the added creaminess pairs so well with the sharpness of cheddar.
Press the Cheese Firmly Into the Chicken
Once you’ve got your adhesive layer down, the next step is to make sure your cheddar is fully secure. This part might seem obvious, but it’s often overlooked: press the cheese firmly into the chicken.
Here’s how I do it: After adding the cheese, use the back of a spoon or your hands to gently but firmly press it into the surface. This ensures the cheese makes full contact with the adhesive layer. If you’re using shredded or grated cheddar, give it a little extra pat-down to work it into every crevice of the chicken. Think of it like tucking the cheese in for a cozy nap—it needs to feel snug!
Layer Your Cheese Strategically
Layering cheese might sound like overkill, but hear me out—it’s a game-changer. Instead of dumping all your cheddar on at once, try layering it strategically to maximize adhesion and melt.
- Start with a thin layer of cheese pressed into the adhesive base.
- Add a second, slightly thicker layer if you’re feeling extra cheesy. The first layer acts like a foundation, holding the rest in place as it melts.
- For an even cheesier crust, sprinkle a mix of cheddar and breadcrumbs on top for added texture. The breadcrumbs absorb some of the oils from the cheese, helping it stick even better.
Pro tip: If you’re baking at a high temperature, consider adding a final layer of cheese midway through the baking process. This ensures the top stays perfectly melty and golden without burning.
Baking Tips for Perfectly Cheesy Chicken
There’s something magical about pulling a perfectly cheesy chicken dish out of the oven—golden, bubbly, and with all the cheddar right where it’s supposed to be. But getting there isn’t as simple as slapping some cheese on top and hoping for the best. Trust me, I’ve had my fair share of cheese-related mishaps. Overcooked cheddar, burnt edges, or cheese that slides right off… yep, I’ve been through it all. Here are some baking tips that’ll help you nail it every single time.
Set the Oven to the Optimal Temperature
Temperature is everything when it comes to baking cheesy chicken. Too low, and the cheese doesn’t melt properly; too high, and it scorches before the chicken is fully cooked. The sweet spot? Around 375°F to 400°F (190°C to 200°C).
At this temperature, the chicken cooks evenly while the cheddar has time to melt and adhere without burning. If you’re cooking bone-in chicken, aim for the lower end of the range to ensure thorough cooking. For boneless cuts, you can bump it up slightly. And don’t forget to preheat the oven—cheese loves a consistent temperature!
Use Parchment Paper, Baking Racks, or Foil
Cleaning up melted cheese that’s stuck to your pan is the worst. Save yourself the headache by using the right tools to prevent mess and make cleanup a breeze.
- Parchment Paper: This is my go-to for most cheesy dishes. It creates a non-stick surface that catches any stray cheese without burning. Plus, it makes transferring the chicken to your plate a seamless process.
- Baking Racks: If you’re going for a crispy-bottomed chicken, place it on a wire rack set over a baking sheet. This setup lets air circulate around the chicken, ensuring even cooking and preventing the cheese from pooling underneath.
- Foil: Aluminum foil is great for easy cleanup and can double as a cover if you want to trap moisture and keep the chicken juicy. Pro tip: Spray the foil with a little non-stick cooking spray to keep the cheese from sticking.
I’ve tried baking directly on a pan before, thinking, “How bad could it be?” Let’s just say the cheese cleanup was a nightmare. Never again.
Add Cheddar During the Final Minutes
Timing is everything with cheddar. If you add it too early, it might overcook, turning into a hard, burnt mess by the time your chicken is done. Instead, try adding the cheddar during the final 5 to 10 minutes of baking.
Here’s my trick: Bake the chicken until it’s almost done—usually when it reaches around 150°F to 155°F (65°C to 68°C) internally. Then, pull it out of the oven, sprinkle on the cheddar, and pop it back in. This way, the cheese has just enough time to melt and turn golden without overcooking.
For an extra gooey finish, you can switch to broil mode for the last 1–2 minutes. Keep a close eye on it, though—cheddar goes from beautifully browned to burnt faster than you’d think. I’ve learned this the hard way more than once!
Common Mistakes to Avoid
Even with the best intentions, it’s easy to make a few missteps when baking cheesy chicken. I know because I’ve made them all—cheese disasters, flavor imbalances, and the dreaded burnt crust. But the good news? These mistakes are totally avoidable once you know what to look out for. Let’s talk about the most common pitfalls and how to steer clear of them.
Adding Cheese Too Early in the Process
This might be the #1 rookie mistake, and honestly, I still slip up occasionally when I’m rushing. Adding cheddar too early can feel logical—after all, you want that melty, golden cheese baked right into your chicken, right? But here’s the problem: cheddar melts fast. Like really fast. If you put it on at the start, it’ll likely burn or harden before the chicken is fully cooked. No one wants a layer of rubbery, charred cheese.
The solution? Patience. Bake your chicken until it’s almost done—about 5 to 10 minutes from completion—then add the cheese. This way, it melts beautifully and gets that perfect golden-brown finish without overcooking. If you’re aiming for extra gooeyness, you can even broil it for a minute or two at the end. Just watch it like a hawk—broilers wait for no one.
Overloading with Too Much Cheese (Yes, It’s Possible!)
I get it: “Too much cheese” sounds like nonsense. But hear me out. Overloading your chicken with cheddar might seem like a dream, but in reality, it can lead to a messy bake. Excess cheese tends to melt off the chicken, pooling in the pan and burning instead of sticking where it should. Plus, it can overpower the dish, making it one-dimensional.
The key is balance. A moderate layer of cheddar, pressed firmly into your chicken, is all you need. If you want extra cheesiness, focus on layering strategically—start with a base layer, bake, and then add a final sprinkle in the last few minutes. Trust me, it’s better to have a smaller amount of perfectly melted cheese than a giant, unmanageable blob.
Neglecting to Balance Flavors and Textures
Cheese is undeniably the star of the show, but even the best cheddar can’t carry an entire dish on its own. A common mistake is neglecting to pair the cheese with complementary flavors and textures. I’ve made this error more times than I’d like to admit, creating dishes that were… fine, but kind of boring.
To avoid this, think about what flavors will enhance the cheddar. A tangy mustard or herbed marinade can add depth, while a crispy breadcrumb topping creates a satisfying contrast to the gooey cheese. Don’t forget to season your chicken properly—salt, pepper, garlic powder, or smoked paprika can make a world of difference. A little balance goes a long way in transforming a good dish into a great one.
Creative Cheddar Coating Ideas for Chicken Recipes
Cheddar-coated chicken is already a comfort food classic, but why stop at the basics? With a little creativity, you can turn your cheesy chicken into a gourmet masterpiece or a bold flavor explosion. Over the years, I’ve experimented with all kinds of cheddar coatings—some were absolute winners, while others, well… let’s just say they were learning experiences. Here are a few ideas to take your cheddar-coated chicken to the next level.
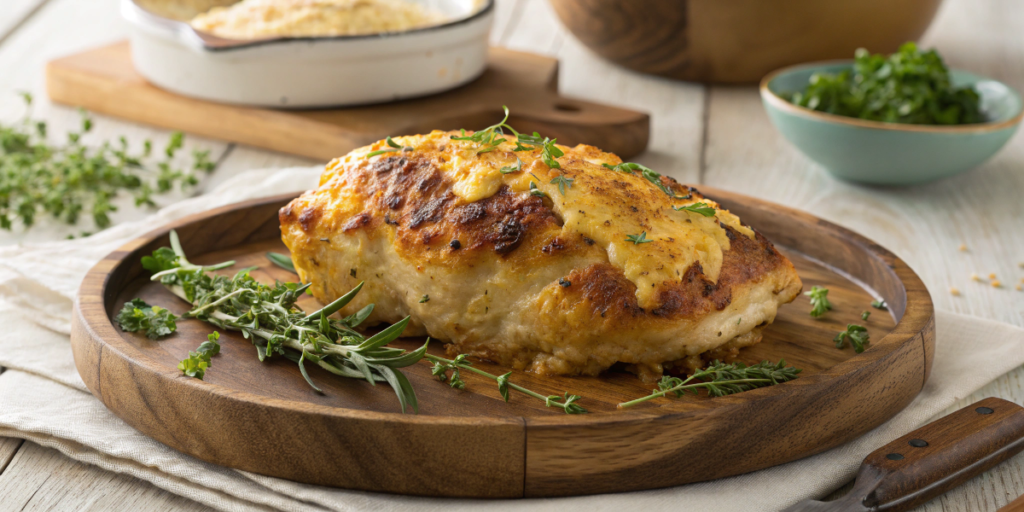
Cheddar and Herb Crusts for a Gourmet Twist
If you’re looking to impress, adding fresh herbs to your cheddar coating is a game-changer. The combo of melty cheese and fragrant herbs gives your chicken a sophisticated, restaurant-quality vibe.
Here’s how I do it: Mix freshly grated cheddar with chopped parsley, thyme, and a hint of rosemary. If you want a little crunch, toss in some panko breadcrumbs. Coat your chicken with a light layer of egg wash or mayo, press the cheddar-herb mixture onto it, and bake until golden. The result? A savory, aromatic crust that’s as beautiful as it is delicious.
Pro tip: Experiment with different herbs. Basil pairs beautifully with sharp cheddar, while dill adds a refreshing twist, especially if you’re serving the chicken with a side of lemony veggies.
Combining Cheddar with Other Cheeses for Enhanced Flavor
Why settle for just cheddar when you can have a medley of cheeses? Combining cheddar with other varieties opens up a world of flavors and textures. Think about the cheesy possibilities—creamy, tangy, nutty… you name it.
One of my favorite blends is cheddar and Parmesan. The sharpness of the cheddar paired with the salty, nutty flavor of Parmesan creates a dynamic duo that’s hard to beat. Another option? Mix cheddar with mozzarella for a gooey, stretchy finish that’s pure comfort food magic. Or, if you’re feeling adventurous, try adding a touch of blue cheese for a bold and tangy kick.
When combining cheeses, keep the ratios in check. A 70/30 split with cheddar as the base usually works best. You still get that classic cheddar flavor, with just enough of the secondary cheese to add some intrigue.
Spicy and Tangy Cheddar Blends for Bold Flavor Profiles
If you’re a fan of big, bold flavors, it’s time to spice things up. Adding heat and tang to your cheddar coating can turn ordinary chicken into a flavor-packed masterpiece.
For a spicy twist, mix your cheddar with a dash of cayenne pepper, smoked paprika, or even a bit of chili powder. If you’re feeling extra adventurous, toss in some finely chopped jalapeños or red pepper flakes. Trust me, the heat pairs beautifully with the creaminess of the cheddar.
If tangy flavors are more your style, consider blending cheddar with a little goat cheese or adding a dollop of Dijon mustard to the base layer. Another trick I love is squeezing fresh lime juice over the chicken before applying the coating. It adds a bright, zesty note that cuts through the richness of the cheese.
Getting cheddar to stick to your chicken while baking isn’t just about the cheese—it’s about the process. With the right prep, techniques, and a little patience, you can enjoy perfectly cheesy chicken every single time. So, grab your apron, test out these tips, and wow your taste buds (and your guests!) with your culinary mastery. And don’t forget to share your results—I’d love to hear how it turned out!


